Uploading a website means copying its files, and usually its database, from your computer to your hosting account so the world can see them. On Domain India shared hosting you can do this three ways: in the browser with your control panel's File Manager, with an FTP program such as FileZilla, or over SSH if you are a developer and jailed SSH has been enabled for your account. This guide gives you the settings for each, shows where the files must go, and fixes the errors people hit most often.
Put your website files in public_html (or the addon domain's own folder), with an index.html or index.php at the top. The quickest way is to zip the site, upload the zip in your control panel's File Manager and extract it there. For FTP, use your server hostname, your control panel username and password, and port 21 with explicit TLS; use SFTP on port 22 only if jailed SSH has been enabled for your account (it is off by default; ask support). Your welcome email and the client area show the exact host and username.
1. Choose how you will upload
All three methods put files in the same place. Pick the one that suits the job.
| Method | Best for | You need | Watch out for |
|---|---|---|---|
| File Manager (browser) | A first upload, a few files, a whole site as one zip | Your control panel login | Very large zips can hit the upload size limit |
| FTP / SFTP (FileZilla) | Many files, big folders, regular updates | An FTP client and the connection settings below | Plain FTP without TLS sends your password unencrypted |
| SSH (developers) | Developers deploying code and updating it often | Jailed SSH enabled on your account by support | Needs basic command-line knowledge |
If unsure, start with the File Manager. It works the same way in cPanel, DirectAdmin and Webuzo; only the menu names differ.
2. Upload with the File Manager (zip and extract)
One zip extracted on the server is far faster and more reliable than hundreds of small uploads.
- Zip your site on your computer.Open your website folder, select everything inside it (not the folder itself), then right-click and choose Send to > Compressed (zipped) folder on Windows, or Compress on a Mac. Zipping the contents, not the parent folder, keeps index.html at the top level after extraction.
- Log in to your control panel.Use the login details in your Domain India welcome email, or open the panel from your hosting service in the client area.
- Open File Manager.In cPanel it is under Files. In DirectAdmin it is under System Info & Files › File Manager; in Webuzo, type "file" in the search box at the top of the panel.
- Go to your website folder.Open public_html for your main domain (see section 4 for the exact path on each panel and for addon domains). If it holds a default placeholder page such as index.html or default.html, delete it or overwrite it.
- Upload the zip.Click Upload, choose your .zip file and wait until the progress bar reaches 100%.
- Extract it.Select the zip, click Extract, and make sure the destination is the same public_html folder. Then open the folder and check that your index file sits directly inside public_html, not inside an extra sub-folder.
- Delete the zip.It is no longer needed, and leaving archives in a public folder lets anyone who guesses the name download your whole site.
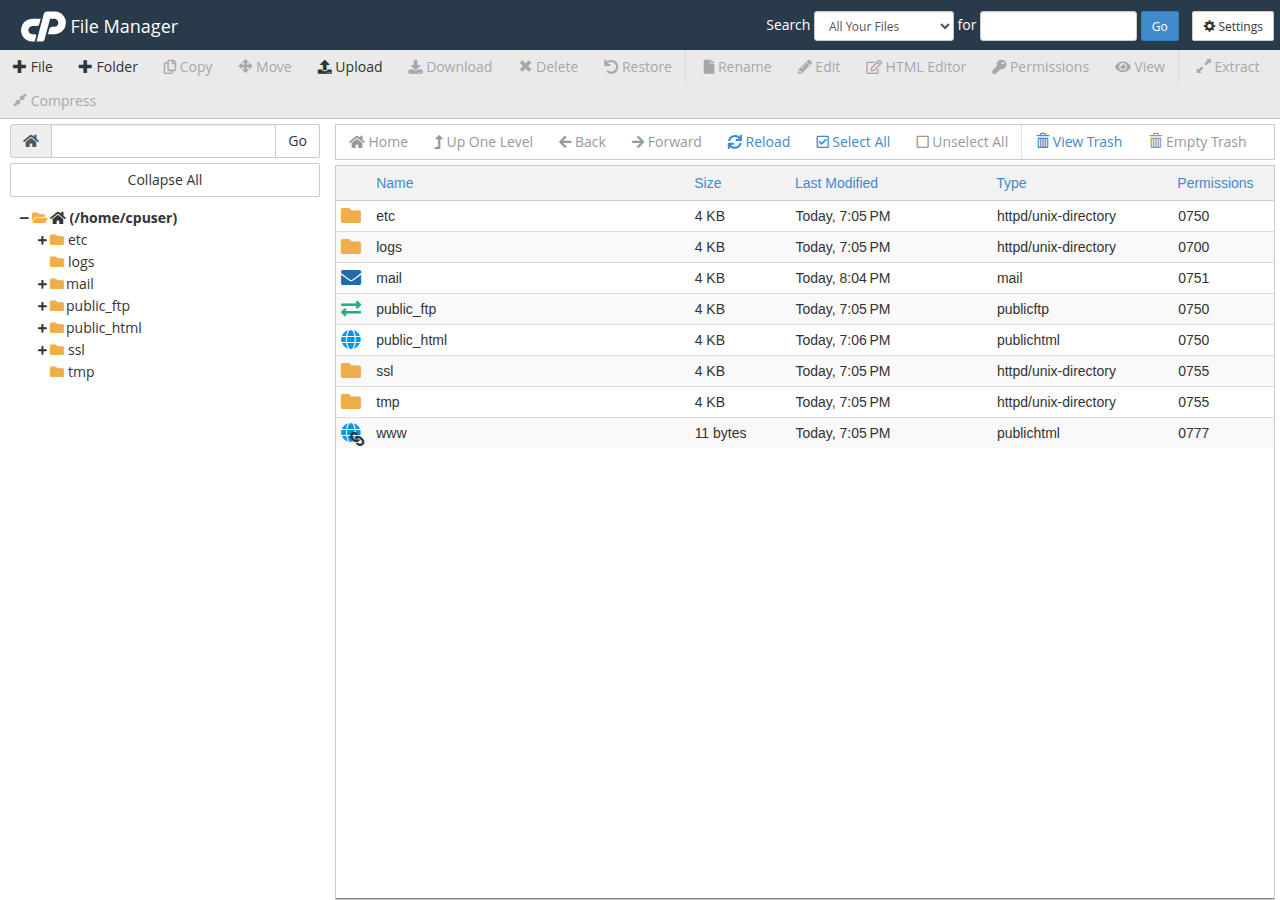
For more detail, see How to use the File Manager in cPanel, Using the File Manager in DirectAdmin and the maximum file size you can upload via the cPanel File Manager.
3. Upload with FTP or SFTP
An FTP client is better for large sites and frequent updates. FileZilla is free for Windows, macOS and Linux; WinSCP and Cyberduck also work.
Connection settings
| Setting | FTP with TLS (FTPES) | SFTP |
|---|---|---|
| Host | Your server hostname, which matches the server's certificate and works before your domain points to the hosting | Your server hostname |
| Port | 21 | 22 |
| Protocol in FileZilla | FTP, with "Require explicit FTP over TLS" | SFTP - SSH File Transfer Protocol |
| Username | Your control panel username, or an FTP account you created | Your control panel username (SSH login) |
| Password | The password for that username | Your control panel password, or an SSH key if the server requires key login |
| When to use | Works on every hosting account | Only when jailed SSH has been enabled for your account |
Your welcome email shows the exact host and username. In the client area, open your hosting service under My Hosting, then Manage › Access, for the username, server IP and control panel address.
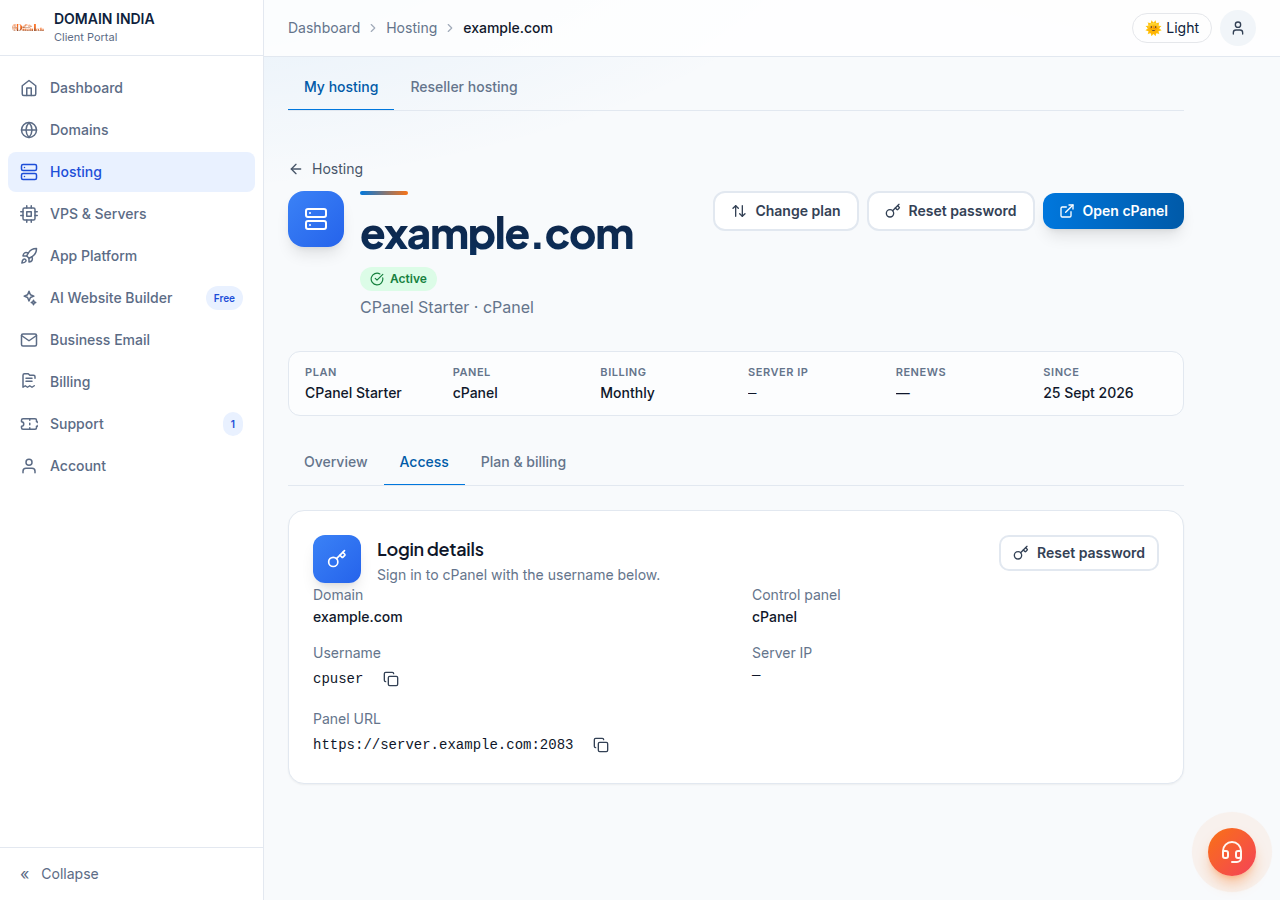
Plain FTP without TLS sends your username and password across the internet unencrypted. Choose explicit FTP over TLS on port 21, or SFTP if jailed SSH is enabled. The first time you connect, FileZilla may show the server's certificate. Do not accept it blindly: How to use SSL/TLS encryption in FTP clients explains which warnings are safe to accept and which to report to support.
Connect with FileZilla
- Open the Site Manager.In FileZilla, go to File > Site Manager > New site.
- Enter the settings.Fill in the host, port, protocol and encryption from the table above. Set Logon Type to Normal and enter your username and password (or Key file for SFTP with an SSH key).
- Set passive mode.On the Transfer Settings tab, choose Passive. It is the default in FileZilla and works through most home and office routers.
- Connect and upload.The left pane is your computer, the right pane the server. Open public_html (or the addon domain's folder) on the right, then drag your website's contents across from the left.
- Check the queue.The Failed transfers tab at the bottom should be empty. Re-send any failed files.
Separate FTP accounts. You can create extra FTP accounts, for example for a web designer, and lock each one to a single folder. In cPanel and DirectAdmin these usernames normally include the domain, such as [email protected]; type the full name in FileZilla. Extra FTP accounts are for FTP only; SFTP uses the main account. See Creating and managing FTP accounts in DirectAdmin and How to upload files via FTP.
Upload over SSH (developers)
Jailed SSH access is available on every shared hosting plan (cPanel, DirectAdmin, Webuzo). It is off by default; ask support to enable it for your account, by live chat or by opening a support ticket. The jailed shell is restricted, and the tools available inside it vary, so ask support whether Git is available before you plan a Git workflow. Where it is, you can update a site from its repository like this:
ssh youruser@your-server-hostname
cd ~/public_html
git pull origin main
Some servers accept key-based login only. Follow the guide for your panel: SSH on cPanel hosting or SSH on DirectAdmin hosting. For a full workflow, read Deploying your website with Git, or the GitHub tutorials for cPanel and DirectAdmin.
Never commit passwords or .env files to a public repository.
4. Where your files must go
Visitors only see files in your domain's document root; files uploaded anywhere else stay hidden.
| Control panel | Main domain | Addon domain |
|---|---|---|
| cPanel | /home/username/public_html | The document root you chose when adding the domain (shown under Domains) |
| DirectAdmin | /home/username/domains/yourdomain.com/public_html | /home/username/domains/addondomain.com/public_html |
| Webuzo | /home/username/public_html | The folder set when the domain was added |
If you are hosting a second website on a plan that allows several, add the domain in your control panel first, then upload into that domain's own folder. See How to add an addon domain in cPanel or in DirectAdmin.
5. The index file: your home page
When someone visits yourdomain.com, the server looks inside the document root for an index file and shows it as the home page. Name it one of these, in lower case:
index.htmlorindex.htmfor a static site;index.phpfor PHP sites, including WordPress, Laravel'spublicfolder and most PHP apps.
Linux servers are case-sensitive, so Index.html will not load as the home page. If an old index.html placeholder sits beside your new index.php, the server may keep showing the placeholder, so delete it.
6. File permissions: 644 and 755
Permissions decide who can read, write and run each file. The safe defaults on shared hosting are:
| Item | Permission | Meaning |
|---|---|---|
| Files (.html, .php, .css, .js, images) | 644 | You can read and write; the web server can only read |
| Folders | 755 | You have full access; the web server can open and list |
| Config files with passwords (such as wp-config.php) | 640 or 600 | Tighter, if your app still works |
777 lets any process on the server change your files, which is how many hacked websites are infected. If a guide or a plugin tells you to set 777, use 755 for the folder instead. Most uploads get the right permissions automatically; change them in the File Manager (Permissions or Change Permissions) or in FileZilla (right-click > File permissions).
More: How to manage file permissions in DirectAdmin.
7. Upload your database and update the config
A static HTML site is done once the files are uploaded. WordPress and most PHP apps also need their database.
- Export the database from the old host or your computer.In phpMyAdmin, select the database, click Export and save the
.sqlfile (a.sql.gzor.zipalso imports). - Create a new database and user.In cPanel use Manage My Databases; in DirectAdmin use Account Manager › Databases; in Webuzo use Database › Manage Databases. Create the database, create a user with a strong password, and give that user all privileges on the database. Note the full names: the panel usually adds your account username as a prefix, such as
username_shop. - Import.Open phpMyAdmin from your control panel, click the new database on the left, choose Import, select your file and click Import (or Go).
- Update your site's config file.Enter the new database name, user and password. The host is almost always
localhost. For WordPress this iswp-config.php; for Laravel and many modern apps it is.env. - Fix the site address if it changed.If you moved from a temporary or old address, update the site URL (in WordPress, the
siteurlandhomevalues) so links and logins point to your domain.
Step-by-step guides: Import a MySQL database in cPanel, Using phpMyAdmin in DirectAdmin and Troubleshooting "Error establishing a database connection" in WordPress.
8. Point your domain to the hosting
Perfectly uploaded files stay invisible if your domain's DNS points somewhere else. It must point to your Domain India hosting.
- Point the whole domain to the hosting (nameservers): open your hosting service in the client area; the Point a domain to this hosting card shows the nameservers for your account (they are also in your welcome email). Enter them on the domain's Nameservers tab if the domain is registered with Domain India, or at your registrar if it is registered elsewhere. Copy the values from your own account, never from a list in an article.
- Keep your current DNS (A records): if your email or other services are managed elsewhere, add two A records,
@andwww, pointing to the server IP address shown on the same card.
The full steps are in How do I change my nameservers and How to change your domain DNS settings. Do not use the client area's Free DNS button for this; it does not copy your records.
DNS changes can take a few hours, sometimes longer, to reach every network, so some visitors may briefly see your old site (why). Meanwhile, use your server hostname as the FTP host.
9. Fix common upload errors
| Error or symptom | Likely cause | Fix |
|---|---|---|
| 530 Login incorrect / Login authentication failed | Wrong username or password, or an FTP account typed without @yourdomain.com | Copy the username exactly from your panel, reset the password there, and try again. Repeated failures can block your IP for a while, so stop after a few attempts and contact support |
| Connection timed out, or "Failed to retrieve directory listing" | Passive-mode ports blocked by your router, firewall or antivirus, or TLS settings | Make sure Transfer mode is Passive, try SFTP if jailed SSH is enabled, and try another network such as a mobile hotspot to rule out your office firewall |
| The default hosting page still shows | An old placeholder index file is still there, the files were extracted into a sub-folder, or DNS still points elsewhere | Delete the placeholder, move your files up into public_html, check DNS, then clear your browser cache |
| 403 Forbidden | No index file in the folder, wrong permissions, or an .htaccess rule | Check index.html or index.php exists, set files to 644 and folders to 755, and read Understanding and resolving HTTP error 403 |
FileZilla users can find more fixes in FileZilla error messages and solutions.
10. Where Domain India hosting fits
Every Domain India shared hosting plan comes with a control panel, File Manager, FTP with TLS, MySQL databases and weekly backups. Developers can ask support to enable jailed SSH access on any plan. For a first website, choose between two entry plans:
- 10 GB NVMe SSD Storage
- 50 GB Monthly Bandwidth
- 1 Website
- 5 Email Accounts
- 25 GB NVMe SSD Storage
- 50 GB Monthly Bandwidth
- 1 Website
- 10 Email Accounts
DA Starter (₹100 a month) includes Softaculous Premium for one-click app installs. cPanel Starter (₹125 a month) has more storage, 25 GB NVMe, on the cPanel interface many tutorials are written for. These are Domain India list prices on 19 September 2026, excluding 18% GST. If you need several websites, the Growth plans on the cPanel and DirectAdmin pages host five each.
Moving an existing site? The DirectAdmin plans list free priority migration; see Migrating your website to us.
What FTP settings do I need to upload my website?
Use your server hostname as the host, your control panel username and password (or an FTP account you created), port 21, and explicit FTP over TLS. If jailed SSH has been enabled for your account (ask support; it is off by default), you can use SFTP on port 22 instead. Your welcome email and the client area show the exact host and username.
Which folder do I upload my website files to?
Upload them into public_html for your main domain. On DirectAdmin the full path is /home/username/domains/yourdomain.com/public_html. An addon domain has its own document root, which your control panel shows when you add the domain.
Why do I still see the default page after uploading my website?
Usually an old placeholder index file is still in public_html, your files were extracted into a sub-folder instead of directly into public_html, or your domain's DNS does not yet point to the hosting. Remove the placeholder, move the files up one level, check DNS and clear your browser cache.
What permissions should my website files have?
Set files to 644 and folders to 755. Never use 777, because it lets other processes on the server change your files.
How do I upload my website's database?
Export it as a .sql file, create a new database and user in your control panel, import the file in phpMyAdmin, then update your site's config file (such as wp-config.php or .env) with the new database name, user and password. The database host is usually localhost.
Why does FileZilla say "530 Login incorrect"?
The username or password is wrong. Extra FTP accounts on cPanel and DirectAdmin use the full name, such as [email protected]. Copy the username from your control panel, reset the password there if needed, and stop after a few failed attempts, as repeated failures can block your IP temporarily.
Ready to put your website online? Compare cPanel hosting and DirectAdmin hosting, or open a support ticket if an upload is not working and we will help you check your settings.
File Manager, FTP, phpMyAdmin and free SSL on every shared hosting plan.
See hosting plans