DirectAdmin's File Manager lets you upload, edit, move and delete your website's files from a web browser, with no FTP program to install. This guide covers DirectAdmin as it runs on Domain India's DirectAdmin hosting (version 1.710 with the Evolution skin): where your files live, the everyday tasks, the trash bin, and the limits worth knowing.
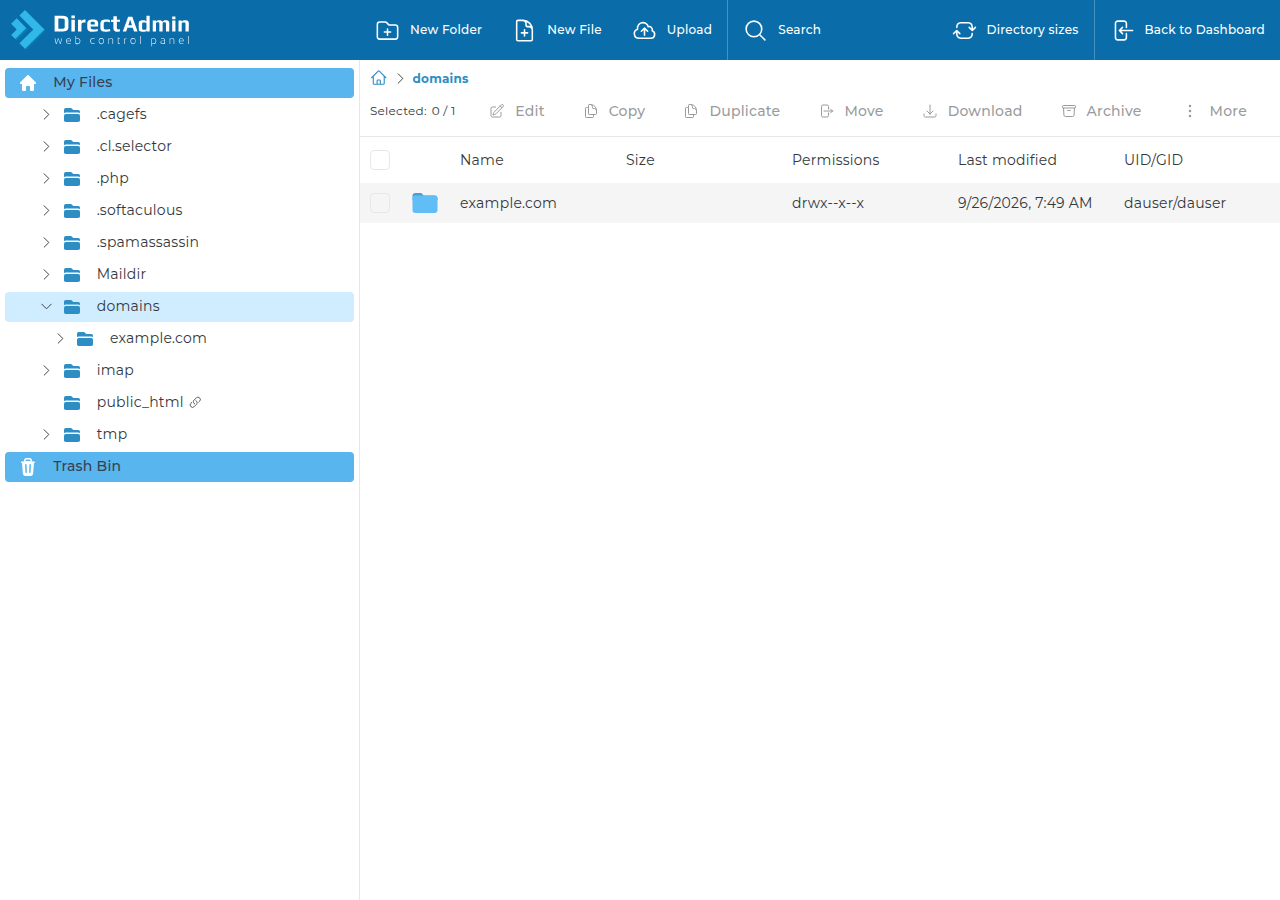
Open DirectAdmin from your hosting service in the client area, then choose File Manager under System Info & Files. Your main site lives in domains/yourdomain.com/public_html. Uploads through File Manager can be up to 500 MB each. Deleted files go to the Trash Bin by default and are kept for 30 days, so you can restore a mistake. Use FTP for very large or frequent transfers.
This page is for DirectAdmin. For cPanel and Webuzo, and a general introduction to file managers, read How to use the File Manager in cPanel, DirectAdmin and Webuzo.
1. Open File Manager
- Sign in to the client areaand open your hosting services.
- Open DirectAdminwith the control panel button on your DirectAdmin service. See how to log in to your control panel if it does not open.
- Choose File Manager.It is in the System Info & Files section of the dashboard. You can also type "file" in the panel's search box.
File Manager opens in your home folder. To see files whose names start with a dot, such as .htaccess, turn on Show hidden files and folders in File Manager's view options.
2. Where your website files live
| What | Folder |
|---|---|
| Main domain website | /home/username/domains/yourdomain.com/public_html |
| Another domain on the same account | /home/username/domains/otherdomain.com/public_html |
| Shortcut in your home folder | public_html links to the main domain's public_html |
| HTTPS copy of the site | private_html normally links to public_html, so one set of files serves both |
| Log archives | domains/yourdomain.com/logs |
Visitors only see files inside public_html. If your homepage exists as both index.html and index.php, the server shows index.html first, so delete the placeholder index.html when you upload a PHP site such as WordPress.
3. Everyday tasks
| Task | How | Tip |
|---|---|---|
| Upload | Open the destination folder, click Upload Files, drag files in | Uploads land in the folder that is open |
| Create | New File or New Folder, type the name | Names are case-sensitive: Logo.png is not logo.png |
| Edit | Select a text file, click Edit, save | Download a copy first |
| Rename | Select the item, click Rename | Renaming a folder breaks links that point to it |
| Copy or move | Select, choose Copy or Move, pick the destination | Moving a site folder changes its address |
| Download | Select a file, click Download | Archive a folder first, then download the archive |
| Zip | Select items, choose Archive | Handy before big changes |
| Unzip | Select the archive, choose Extract or Extract to | Check the destination folder first |
| Permissions | Select the item, choose Set Permissions | 644 for files, 755 for folders |
Upload a whole website
Zip the site on your computer (select the files inside the folder, not the folder itself), upload that one file to public_html, then extract it there. Make sure index.php or index.html ends up directly inside public_html, not one folder deeper. Delete the zip afterwards, because anyone who guesses its name could download your site.
File Manager accepts uploads of up to 500 MB per file on our DirectAdmin server. That is separate from PHP's upload limit of 64 MB, which applies to uploads made through your website, such as the WordPress media library or a plugin installer.
Edit a file safely
The editor is fine for small changes to .htaccess, wp-config.php or a theme file. One typo in these files can take the site down with a 500 error, so download a copy before you edit. Note two DirectAdmin rules for .htaccess: php_value and php_flag lines cause a 500 error because PHP does not run as an Apache module here, and only some Options values are allowed. See Mastering .htaccess before you add rules.
4. Permissions
| Item | Use | Notes |
|---|---|---|
| Files | 644 | You can write; the web server can read |
| Folders you create | 755 | Standard for web folders |
wp-config.php and other files with passwords | 640 or 600 | If your application still works |
public_html | 755 | Leave as it is |
Your home folder and domains | 710 and 711 | Set by the server; do not change |
Never use 777. It lets other processes change your files and is a common way sites get infected. For more, see How to manage file permissions in DirectAdmin, and for "403 Forbidden" errors caused by permissions, Understanding and resolving HTTP error 403.
5. Delete and restore from the Trash Bin
On our DirectAdmin server, Move To Trash is selected by default when you delete. Items in the Trash Bin can be restored to where they were, and the server empties items older than 30 days. You can untick the option and choose Delete permanently instead, and Empty trash bin clears it at once.
Trashed files still use your disk space until they are emptied. If a file was deleted permanently, or more than 30 days ago, restore it from your weekly JetBackup backup: see Restoring from JetBackup in DirectAdmin.
6. When to use FTP or SSH instead
File Manager is best for quick jobs. Use an FTP client such as FileZilla, with TLS, when you move hundreds of files or a very large site, or when a transfer needs to resume after a break. DirectAdmin FTP logins take the form [email protected]; see Uploading files via FTP and What settings do I need to upload my website?.
Jailed SSH access is available on every shared hosting plan. It is off by default; ask support to enable it, and sign in with an SSH key. Inside the jail you can use scp, SFTP, tar and Git, but rsync is not available. See Enabling and accessing jailed SSH.
7. Troubleshooting
| Problem | Likely cause | Fix |
|---|---|---|
| Upload stops or fails | File over 500 MB, slow connection, or disk full | Zip and split the upload, use FTP, or free up space |
| New files do not show on the site | Wrong folder, or an old index.html is still there | Upload into domains/yourdomain.com/public_html; remove the placeholder |
| 500 error after editing | A typo, or php_value in .htaccess | Put back the copy you downloaded |
| "Permission denied" when saving | The file or folder is not writable | Set 644 on the file or 755 on the folder |
| Cannot edit an image | The editor handles text files only | Edit it on your computer and upload again |
8. DirectAdmin hosting at Domain India
Every Domain India DirectAdmin plan includes File Manager, Softaculous for one-click installs, free Let's Encrypt SSL and weekly JetBackup backups you can restore yourself. Plans start at ₹100 a month, excluding 18% GST (Domain India list price on 19 September 2026). Compare them on DirectAdmin hosting.
- 10 GB NVMe SSD Storage
- 50 GB Monthly Bandwidth
- 1 Website
- 5 Email Accounts
Where is File Manager in DirectAdmin?
Log in to DirectAdmin and open File Manager in the System Info & Files section of the dashboard, or type "file" in the panel's search box. It opens in your home folder.
Where do I upload my website in DirectAdmin?
Upload it to /home/username/domains/yourdomain.com/public_html. The public_html folder in your home folder is a shortcut to the main domain's public_html, so either route reaches the same files.
What is the largest file I can upload with DirectAdmin File Manager?
On the Domain India DirectAdmin server, File Manager accepts uploads of up to 500 MB per file. Uploads made through your website, such as the WordPress media library, are limited by PHP to 64 MB.
Can I recover a file I deleted in DirectAdmin File Manager?
Usually, yes. On the Domain India DirectAdmin server, deleted files go to the Trash Bin by default and are kept for 30 days, so you can restore them. If you chose Delete permanently, restore the file from your JetBackup backup.
How do I see .htaccess in DirectAdmin File Manager?
Files that start with a dot are hidden until you turn on the option to show hidden files and folders in File Manager's view options.
What permissions should my files have?
Use 644 for files and 755 for folders you create. Leave the home folder, domains folder and public_html as the server set them, and never use 777.
Ready to manage your files? Open DirectAdmin from your hosting services, or open a support ticket with your domain and a screenshot if File Manager shows an error.
Tell us the domain, the folder and what you were trying to do, and we will help you get it working.
Open a support ticket