File Manager is the file browser built into your hosting control panel. It lets you upload, edit, move and delete your website's files from a web browser, with no FTP program to install. This guide covers cPanel in detail and shows where the same tools sit in DirectAdmin and Webuzo.
Open File Manager from your control panel (in cPanel it is under Files), go to public_html, and use the toolbar or right-click menu to upload, edit, rename, move, compress and extract files. Turn on hidden files in Settings to see .htaccess. For a large site, upload one zip and extract it on the server. Download a copy of any file before you edit it, and use FTP when you have many files to move.
1. Open File Manager
The quickest route is through the Domain India Client Portal, which signs you in to your control panel without a separate password.
- Sign in to the Client Portal.Open Hosting › My hosting and find the row for your domain.
- Open your control panel.Click the panel button on that row, for example cPanel. A new tab opens, already signed in. If nothing opens, allow pop-ups for domainindia.com and click again.
- Find File Manager.In cPanel it is in the Files section. In DirectAdmin it is under System Info & Files › File Manager; in Webuzo, type "file" in the search box at the top of the panel.
- Go to your website folder.The folder tree is on the left and the contents of the open folder on the right. Your main website lives in public_html.
You can also sign in directly with the username and password from your welcome email. See How to log in to cPanel for both routes and for fixes when a login fails.
Where your website files live
| Control panel | Main domain | Addon domain |
|---|---|---|
| cPanel | /home/username/public_html | The document root you chose when adding the domain |
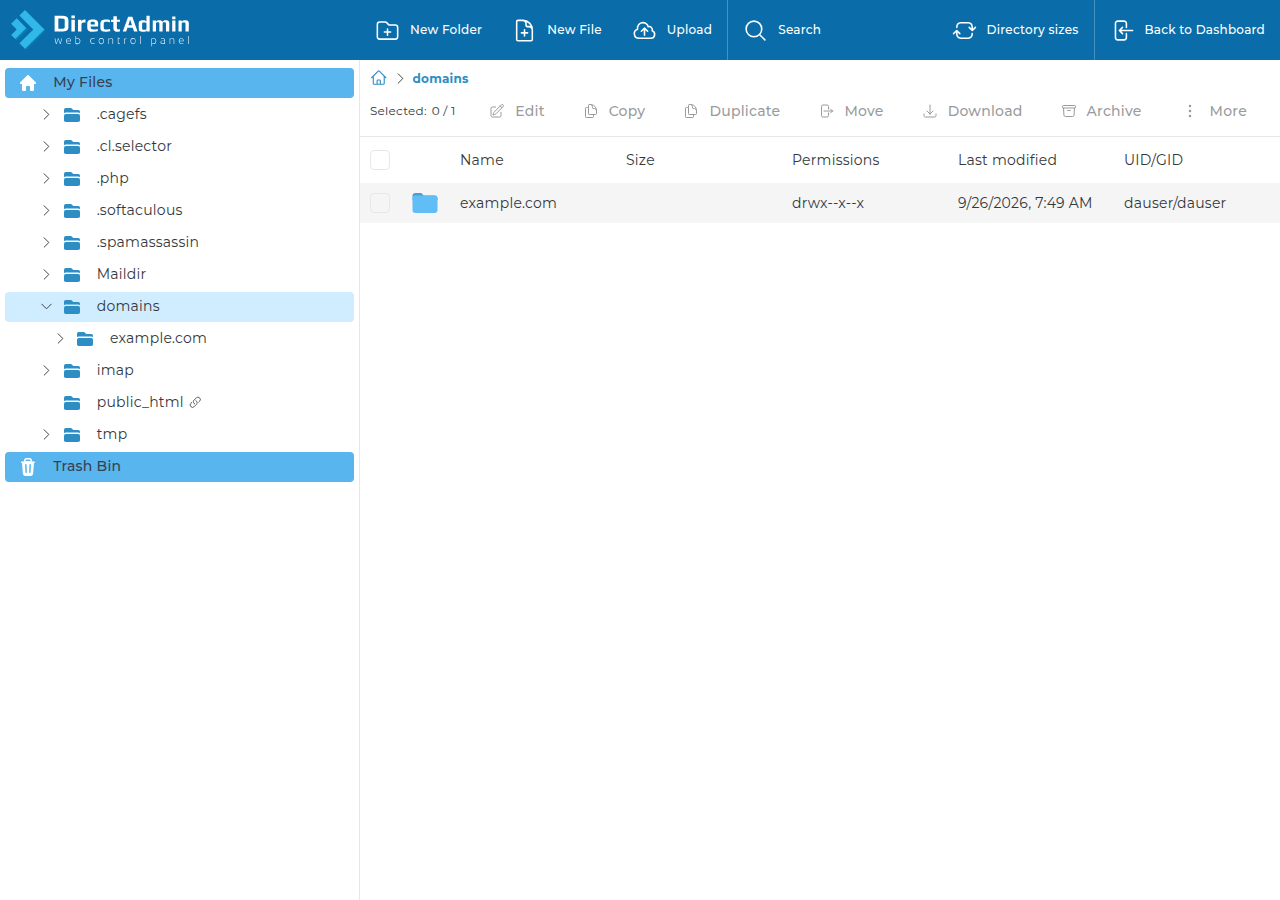
| DirectAdmin | /home/username/domains/yourdomain.com/public_html | /home/username/domains/addondomain.com/public_html |
| Webuzo | /home/username/public_html | The folder set when the domain was added |
Visitors see only files inside the document root; a site uploaded anywhere else "does not show".
Find your way around
In cPanel's File Manager:
- Toolbar: the buttons along the top (+ File, + Folder, Copy, Move, Upload, Download, Delete, Rename, Edit, Permissions, Extract, Compress and more) act on whatever you have selected.
- Right-click menu: right-click any file or folder for the same actions.
- Path bar and Home: type a path and press Go, or click Home to return to your home folder. Up One Level moves up.
- Search: the search box at the top finds files by name across your account or in the current folder.
- Select several items: hold Ctrl (or Cmd on a Mac) and click, or use Select All.
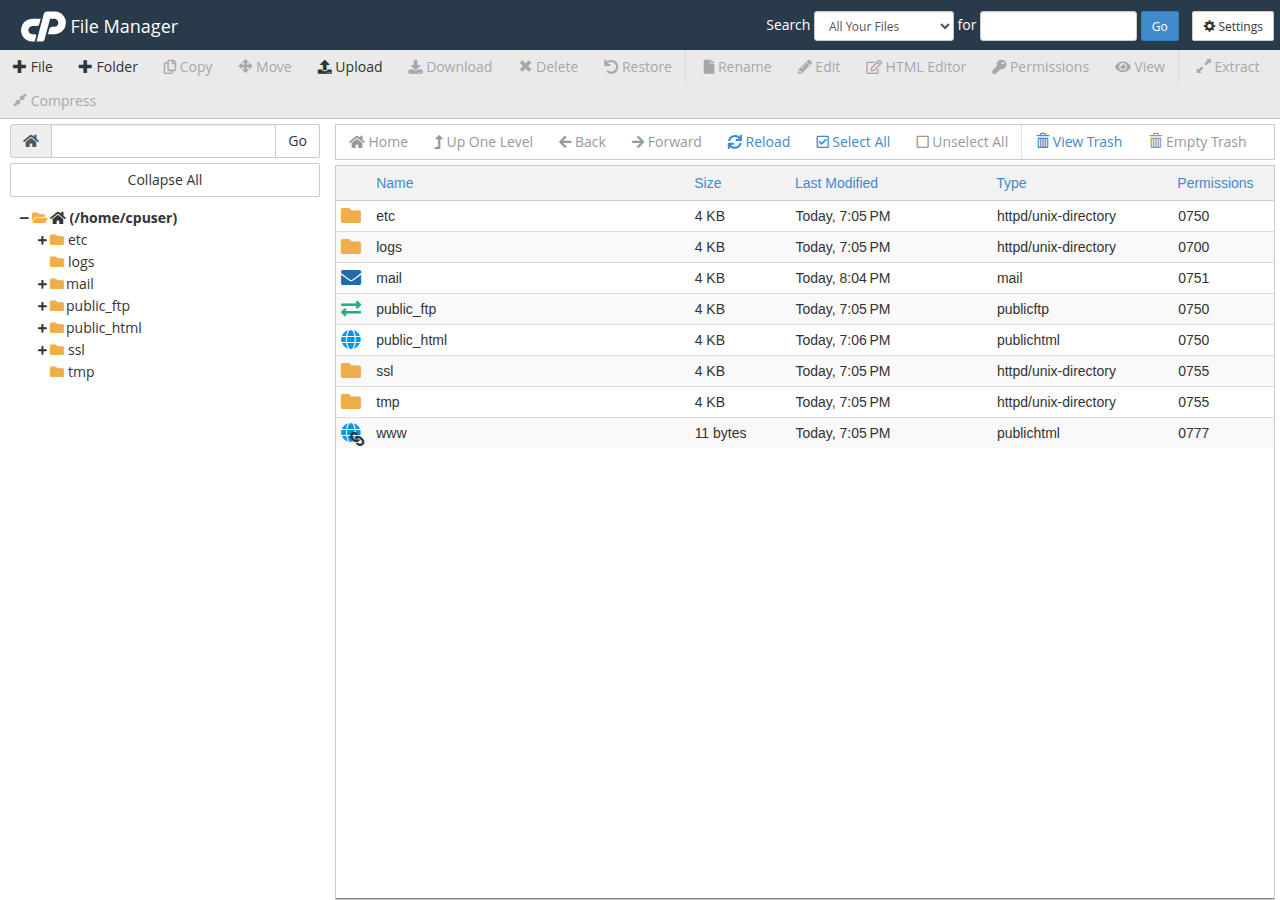
DirectAdmin and Webuzo work the same way with different button names: a toolbar, a right-click menu, and checkboxes to select several items.
2. Show hidden files such as .htaccess
Files whose names start with a dot, such as .htaccess, .user.ini and .env, are "hidden files". Many sites depend on them, and cPanel hides them until you ask.
- Click Settings.It is at the top right of cPanel's File Manager.
- Tick "Show Hidden Files (dotfiles)".
- Click Save.The dotfiles now appear in every folder.
In DirectAdmin and Webuzo, if dotfiles do not appear, look for a similar show-hidden-files option in the file manager's settings or view menu. To learn what .htaccess controls, read Mastering .htaccess.
3. Common tasks at a glance
| Task | In cPanel File Manager | Tip |
|---|---|---|
| Upload files | Select the folder, click Upload, drag files in | Tick Overwrite existing files to replace old copies |
| Create a file or folder | + File or + Folder | Names are case-sensitive: Index.html is not index.html |
| Edit a file | Select it, click Edit | Download a copy first |
| Rename | Select it, click Rename | Renaming a folder breaks links that point to it |
| Change permissions | Select it, click Permissions | 644 for files, 755 for folders |
| Zip files | Select them, click Compress, choose Zip Archive | Zip a folder before downloading it |
| Unzip | Select the zip, click Extract | Check the destination path first |
| Move or copy | Select, click Move or Copy, enter the destination path | You can also drag items onto a folder in the tree |
| Download | Select a file, click Download | Folders must be compressed first |
| Delete and restore | Delete, then View Trash › Restore | Only if "Skip the trash" was not ticked; DirectAdmin has a Trash Bin too |
4. Upload files
- Open the destination folderfirst, usually public_html. Uploads land in whichever folder is open.
- Click Upload.cPanel opens the upload page in a new tab.
- Drag files in, or click Select File.Tick Overwrite existing files if you are replacing files already on the server.
- Wait for 100%.Each file shows a progress bar. Then click the link back to the folder and refresh it to see the new files.
Browser uploads have a per-file size limit set by the server, and a very large file can also time out on a slow connection. You cannot upload a whole folder tree this way either.
Zip your site on your computer (select the files inside the folder, not the folder itself), upload that one zip, then use Extract on the server. One zip is far faster and more reliable than hundreds of small uploads. Delete the zip afterwards, because anyone who guesses its name could download your whole site.
For the full upload walkthrough, including FTP settings and the database, read What settings do I need to upload my website?.
5. Create, edit and rename files
Create: open the folder, click + File or + Folder, type the name with its extension (for example contact.php) and confirm. Web servers on Linux are case-sensitive, so use lower-case names for pages and images.
Edit: select a text file (.html, .php, .css, .js, .htaccess) and click Edit. cPanel first asks for the character encoding; keep utf-8 unless you know otherwise, then click Edit again. The editor opens in a new tab with line numbers and syntax highlighting. Click Save Changes when you are done. File Manager cannot edit images or other binary files: edit those on your computer and upload them again.
Rename: select the item, click Rename, type the new name and confirm. Renaming a file or folder breaks every link, image path and setting that uses the old name, so update those too.
One typo in .htaccess, wp-config.php or a theme file can take the whole site offline with a 500 error. Before editing, select the file and click Download to keep the original on your computer. Before bigger changes, compress the folder into a zip. If the site breaks after you save, put the original back and it works again.
6. Set file permissions (644 and 755)
Permissions decide who can read, write and run each file.
| Item | Permission | Meaning |
|---|---|---|
| Files (.html, .php, .css, .js, images) | 644 | You can read and write; the web server can only read |
| Folders | 755 | You have full access; the web server can open and list |
| Config files with passwords (such as wp-config.php) | 640 or 600 | Tighter, if your app still works |
To change them in cPanel, select the item and click Permissions (or right-click and choose Change Permissions), tick the boxes or type the number, then click Change Permissions. In DirectAdmin and Webuzo the option is also called permissions or chmod; see How to manage file permissions in DirectAdmin.
Never set 777. It lets anything on the server change your files, and it is a common way websites get infected. Wrong permissions are also a frequent cause of "403 Forbidden": see Understanding and resolving HTTP error 403.
7. Compress, extract, move and copy
Compress (zip): select one or more files or folders, click Compress, choose Zip Archive (it opens on any computer), give the archive a name and path, and click Compress File(s). Use this to download a folder, to keep a quick copy before changes, or to move many files at once.
Extract (unzip): select a .zip, .tar.gz or similar archive, click Extract, check the destination folder and click Extract File(s). Then open the folder and make sure your files did not land inside an extra sub-folder: your index.html or index.php must sit directly inside public_html. If they are one level too deep, select them all and Move them up.
Move or copy: select the items, click Move or Copy, type the destination path (for example /public_html/old-site) and confirm. In cPanel you can also drag items onto a folder in the left-hand tree to move them.
Moving your site to a different folder changes its address. Copying a large folder uses extra disk space, so delete old copies you no longer need.
8. Delete files and restore from the Trash
In cPanel, Delete asks you to confirm. If you leave Skip the trash and permanently delete the files unticked, the items go to a Trash folder (.trash in your home folder) instead of disappearing.
- Click View Trashin the toolbar.
- Select what you need back.
- Click Restore.The item returns to the folder it was deleted from.
Items in the Trash still count towards your disk space. Click Empty Trash when you are sure you do not need them. If you ticked "Skip the trash", the file is gone from File Manager, and your only way back is a JetBackup backup.
DirectAdmin's File Manager also has a Trash Bin: deleted files go there by default and are kept for 30 days, so you can restore a mistake. See the DirectAdmin File Manager guide. Webuzo's File Manager also has a Trash, listed under the folder tree, and Webuzo accounts are backed up every night, with restores through a support ticket; still download or zip anything important before you delete it. cPanel and DirectAdmin accounts also get weekly JetBackup backups; see backing up and restoring with JetBackup.
9. When to use FTP or SSH instead
File Manager is ideal for quick jobs: one upload, a small edit, a zip to extract. Use an FTP client such as FileZilla when you:
- move hundreds of files or a very large site;
- update the same files often and want to sync folders;
- need to resume a transfer that was interrupted.
Developers who deploy code regularly are better served by Git. Jailed SSH is available on every shared plan but is off by default, so ask support to enable it, and log in with an SSH key: see enabling and accessing jailed SSH and deploying with Git. What settings do I need to upload my website? has the FTP, SFTP and SSH settings.
10. File Manager on Domain India hosting
Every Domain India shared hosting plan comes with a control panel, and each panel includes a File Manager. When File Manager is not enough, move to FTP with TLS, or ask support to enable jailed SSH (off by default) for SFTP and Git. cPanel and DirectAdmin accounts get weekly JetBackup backups (taken on Sunday, 5 copies kept) that you can restore from the panel, which is your safety net when a file is gone from the trash too.
Compare all plans and live prices on cPanel hosting, DirectAdmin hosting and Webuzo hosting.
Frequently asked questions
Where is File Manager in cPanel?
Log in to cPanel and open the Files section, then click File Manager. It opens in a new tab showing your home folder. Your main website's files are in the public_html folder.
Why can't I see my .htaccess file?
Files whose names start with a dot are hidden by default. In cPanel's File Manager, click Settings at the top right, tick Show Hidden Files (dotfiles) and click Save.
How do I upload a large website through File Manager?
Zip the site on your computer, upload the single zip file to public_html, then select it and click Extract. Delete the zip afterwards. For very large sites or many separate files, use an FTP client such as FileZilla instead.
What permissions should my website files have?
Use 644 for files and 755 for folders. Configuration files that hold passwords, such as wp-config.php, can be 640 or 600 if the site still works. Never use 777.
Can I recover a file I deleted in File Manager?
In cPanel, yes, if you did not tick Skip the trash: click View Trash, select the file and click Restore. In DirectAdmin, deleted files go to the Trash Bin by default and are kept for 30 days. If the file was deleted permanently, restore it from a JetBackup backup.
How do I download a whole folder?
File Manager downloads single files only. Select the folder, click Compress, choose Zip Archive, then select the new zip file and click Download.
My site shows a 500 error after I edited a file. What should I do?
Undo the edit. Upload the copy you downloaded before editing, or fix the line you changed, especially in .htaccess or wp-config.php. If you did not keep a copy, restore that file from a backup.
Ready to upload your site? Follow What settings do I need to upload my website?, or open a support ticket with your domain name and a screenshot if File Manager shows an error.
Every Domain India shared hosting plan includes a control panel with File Manager, plus jailed SSH on request for developers.
See cPanel hosting plans