Installing WordPress by hand takes about fifteen minutes and teaches you exactly where your site lives: the files in one folder, the content in one database, and one file, wp-config.php, that joins the two. This guide walks through the manual install on Domain India shared hosting, from downloading WordPress to switching the finished site to HTTPS.
Download WordPress from wordpress.org, upload the zip to public_html with your control panel's File Manager and extract it. Create a MySQL database and a database user, give the user all privileges on that database, then open your domain in a browser and let the WordPress installer write wp-config.php for you. Finish by setting file permissions, changing the table prefix from the default, and forcing HTTPS once your free SSL certificate is issued.
1. Manual install or app installer?
There are two ways to put WordPress on shared hosting. An app installer does every step below for you in one form. The manual method takes longer, but you choose every name and password yourself, and you learn how the pieces fit together, which helps later when you move a site, restore a backup or fix a database error.
| Question | Manual install (this guide) | App installer |
|---|---|---|
| Time | About 15 minutes | 2 to 3 minutes |
| Database name, user and prefix | You choose each one | Generated, editable in advanced options |
| What you learn | Where files, database and config live | Very little |
| Best for | Developers, learners, custom setups | Getting a standard site live quickly |
Our cPanel servers have both Softaculous and WP Toolkit installed, and our DirectAdmin and Webuzo plans include Softaculous. Each can install WordPress in one form, so if you only want a working site, you can use one of them and skip this guide. See How to install WordPress on cPanel, on DirectAdmin or on Webuzo.
2. What you need before you start
- An active hosting account. Sign in to the client area and open My Hosting. The button on your domain's row, labelled cPanel or DirectAdmin, signs you straight into your control panel; on Webuzo, log in at
https://yourdomain.com:2003. - Your domain pointing at the hosting. The installer runs in the browser at your domain, so the domain must already reach our server. If it does not yet, see How to change your domain's DNS settings.
- A current PHP version. Our cPanel servers offer a wide range of PHP versions up to 8.5, selectable per account. Choose a recent version that WordPress supports; the current minimum and recommended versions are listed on wordpress.org's requirements page. On cPanel, set it in MultiPHP Manager: see How to change PHP versions in cPanel.
- A password manager or somewhere safe to note the database password and the WordPress admin password you are about to create.
If public_html already holds a website, download a copy of its files and export its database first. Extracting WordPress into the same folder can overwrite files such as index.php and .htaccess.
3. Download WordPress
Always download WordPress from the official site, never from a third-party "free download" page, which can carry hidden malware.
- Go to wordpress.org/download.
- Download the latest release as a
.zipfile. Do not unzip it on your computer: uploading one zip file is much faster than uploading thousands of small files.
4. Upload and extract the files
- Open File Manager.In cPanel, open Files › File Manager. In DirectAdmin, open File Manager. On a main domain, your web folder is
public_html; on DirectAdmin it sits insidedomains/yourdomain.com/. - Go into the web folder.Open
public_html. If it contains only a placeholder page such asindex.htmlordefault.html, delete it so it does not show instead of WordPress. - Upload the zip.Click Upload, choose the WordPress zip from your computer and wait until the progress bar reaches 100%.
- Extract it.Back in File Manager, select the zip and click Extract. This creates a folder called
wordpress. - Move the files up one level.Open the
wordpressfolder, select all files and folders inside it, and use Move to send them topublic_html. Then delete the emptywordpressfolder and the zip.
When you finish, public_html should directly contain wp-admin, wp-content, wp-includes, index.php and wp-config-sample.php. If you want WordPress at yourdomain.com/blog instead, leave the files in a folder named blog rather than moving them up.
For more on the tool itself, read How do I use the File Manager. If you prefer FTP, the connection details are in What settings do I need to upload my website.
5. Create the database and database user
WordPress stores every post, page, setting and user in a MySQL database. You need three things: a database, a user, and permission for that user on that database.
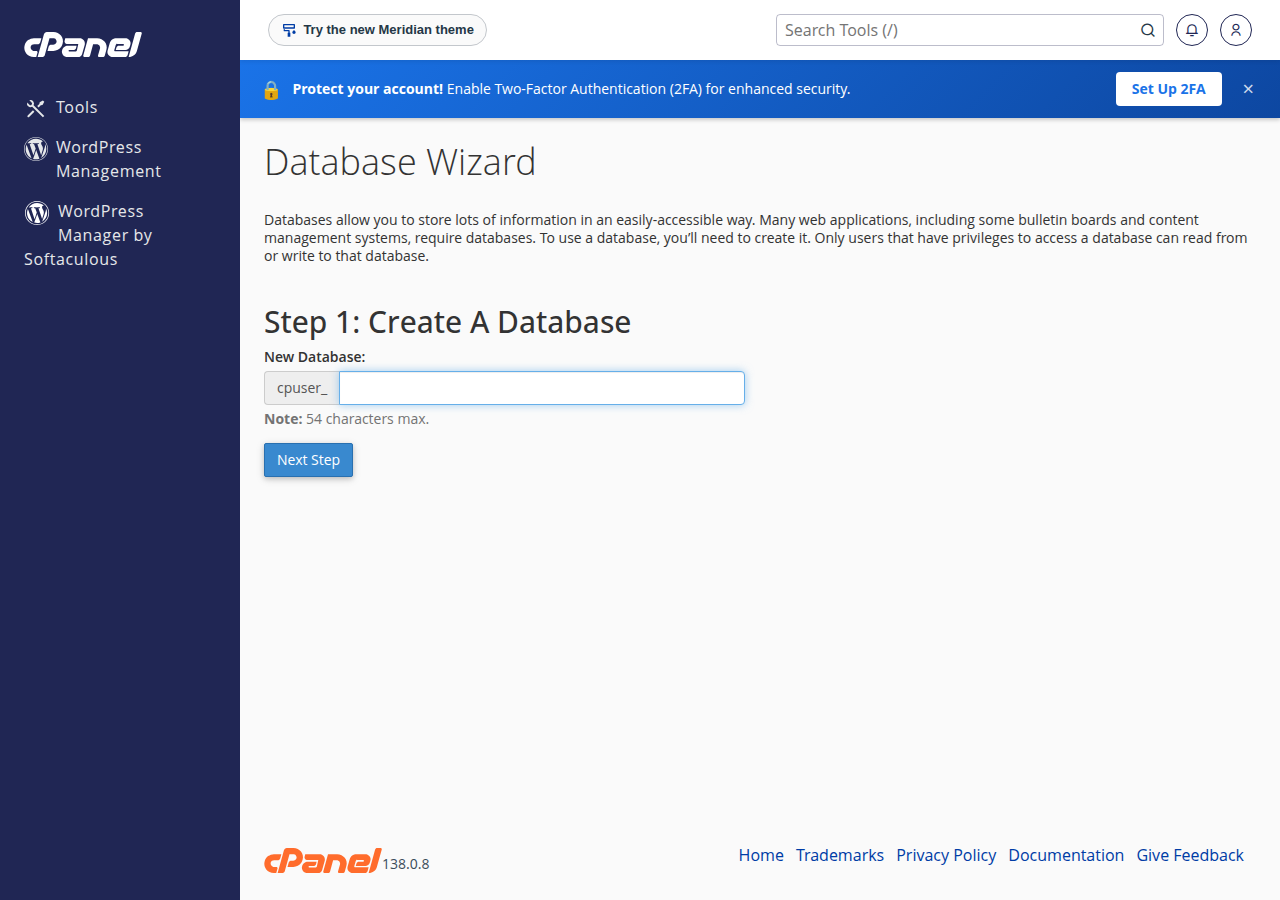
In cPanel: Database Wizard
- Open Databases › Database Wizard.
- Step 1: type a database name, for example
wp1, and click Next Step. cPanel adds your account username as a prefix, so the full name becomescpanelusername_wp1. - Step 2: type a user name and use the Password Generator for a long random password. Copy the password before you continue.
- Step 3: tick ALL PRIVILEGES and click Next Step.
If you prefer, Databases › Manage My Databases does the same thing on one page: create the database, create the user, then use Add User To Database and grant all privileges. Forgetting that last step is the most common reason the installer fails; see Installer could not find database user.
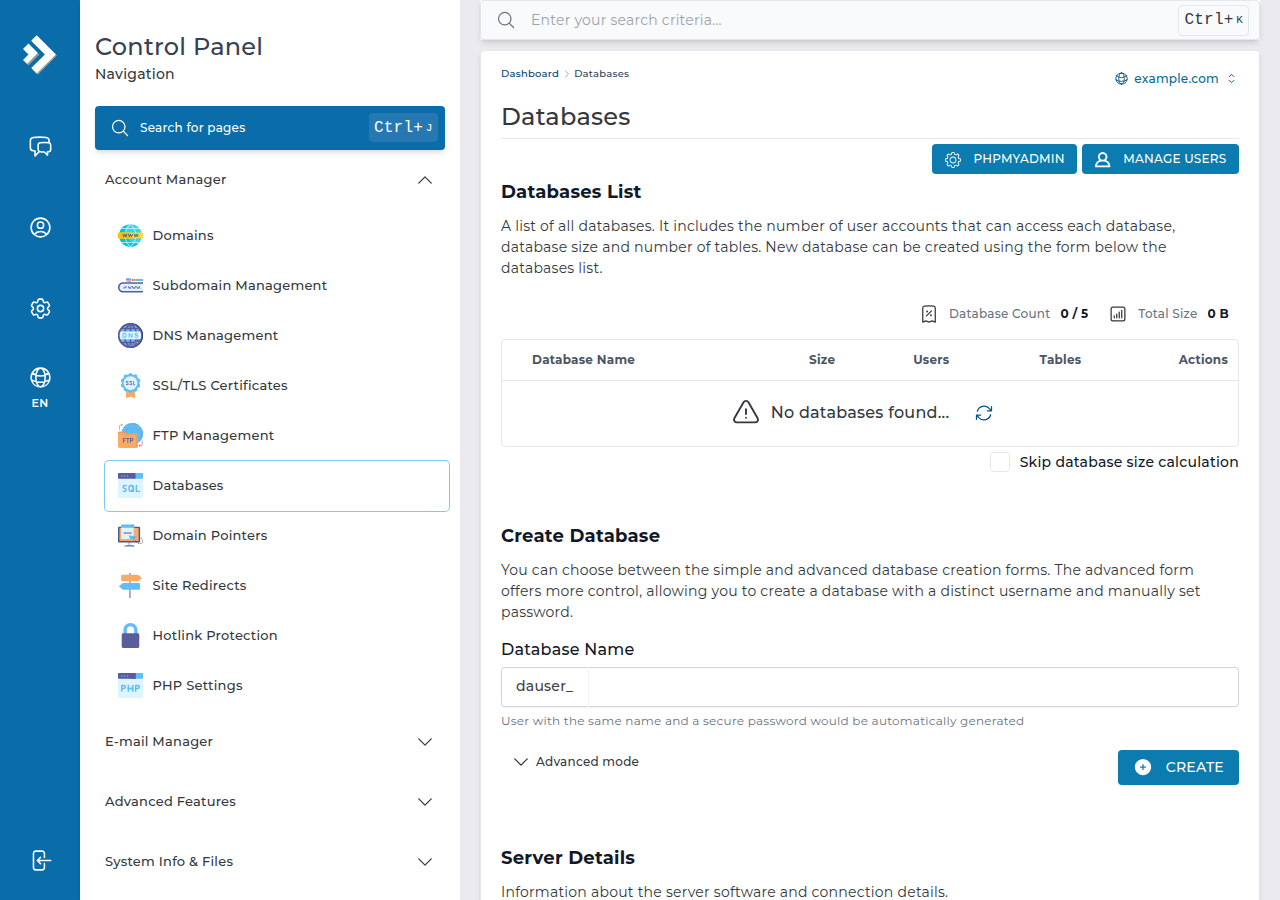
In DirectAdmin: Databases
Open Account Manager › Databases, type a database name in the Create Database form and click CREATE. DirectAdmin creates a user with the same name, a secure password and access to that database in the same step (open Advanced mode to choose your own user name and password), and also prefixes both names with your account username. Full steps: Creating and managing MySQL databases in DirectAdmin. On Webuzo, see Create and manage MySQL in Webuzo.
Write down these four values. You need them in the next step.
| Setting | What to enter |
|---|---|
| Database name | The full prefixed name, e.g. cpanelusername_wp1 |
| Username | The full prefixed user, e.g. cpanelusername_wpuser |
| Password | The generated password |
| Database host | localhost |
WordPress and MySQL run on the same shared server, so the database host is localhost. MySQL port 3306 is firewalled from outside on our shared servers. If you ever need to reach the database from your own computer, use an SSH tunnel, as explained in How to connect to the MySQL database.
6. Run the WordPress installer
Open https://yourdomain.com in your browser (or http:// if the SSL certificate is not issued yet). WordPress detects that it is not configured and starts its setup screens.
- Choose a languageand click Continue, then Let's go!
- Enter the database details.Type the database name, username, password and database host (
localhost) exactly as you noted them. - Change the table prefix.Replace the default
wp_with something unique, such asds7k_. Use letters, numbers and an underscore only. - Submit, then Run the installation.WordPress tests the connection and writes
wp-config.phpfor you, including fresh security keys. - Set up the site.Enter the site title, an admin username that is not
admin, a strong password, and an email address you actually read, because password resets go there. - Search engine visibility.Tick "Discourage search engines" only while the site is unfinished, and remember to untick it at launch.
- Install WordPress, then log inat
https://yourdomain.com/wp-admin.
If the installer cannot write wp-config.php
WordPress then shows the configuration text and asks you to create the file yourself. In File Manager, copy wp-config-sample.php to wp-config.php, edit it, and fill in these lines:
define( 'DB_NAME', 'cpanelusername_wp1' );
define( 'DB_USER', 'cpanelusername_wpuser' );
define( 'DB_PASSWORD', 'your-generated-password' );
define( 'DB_HOST', 'localhost' );

$table_prefix = 'ds7k_';
Replace the block of lines that say put your unique phrase here with a fresh set of keys from WordPress's secret-key generator. Save, reload your domain, and the installer continues at the site-setup screen.
If you see "Error establishing a database connection" instead, one of the four values is wrong or the user was not added to the database. Work through Troubleshooting the error establishing a database connection.
7. Secure the new install
A fresh WordPress site is a target within days of going online. These steps take a few minutes and remove the easiest ways in.
wp_ makes automated SQL-injection attacks that assume default table names fail.755, files 644. Never set anything to 777.640 or 600; if the site then shows an error, set it back to 644.To set permissions in cPanel's File Manager, select a file or folder and click Permissions; in DirectAdmin, see How to manage file permissions in DirectAdmin.
Our shared servers add a server-wide layer on top: Imunify360 with its web application firewall and WordPress protection turned on by default, and automatic removal of malicious code from infected files (measured on our cPanel servers, 20 September 2026). That helps, but it does not replace your own updates and passwords. For the full checklist read The complete WordPress hardening guide and Why and how your WordPress website gets hacked.
8. Switch the site to HTTPS
Every Domain India shared hosting plan includes a free SSL certificate. On our cPanel servers, AutoSSL issues Let's Encrypt certificates automatically once your domain points at the server (measured 20 September 2026). On DirectAdmin, see How to enable Let's Encrypt SSL certificates in DirectAdmin.
Only switch WordPress to HTTPS after the certificate is issued. Open https://yourdomain.com first: if the browser shows a padlock without warnings, continue.
- Update the WordPress addresses.In WordPress, go to Settings › General and change both WordPress Address (URL) and Site Address (URL) from
http://tohttps://. Save. You will be logged out; log in again. - Redirect all visitors.In cPanel, open Domains and turn on Force HTTPS Redirect for your domain. On other panels, add a redirect to the top of
.htaccessin your web folder. - Check for mixed content.Open a few pages and look for padlock warnings. Old image links that still start with
http://are the usual cause; edit them or replace the URLs in the database.
The .htaccess redirect for Apache, which runs on all our shared hosting, is:
RewriteEngine On
RewriteCond %{HTTPS} off
RewriteRule ^(.*)$ https://%{HTTP_HOST}%{REQUEST_URI} [L,R=301]
More detail: AutoSSL in cPanel and Force HTTPS redirect.
If you change the WordPress addresses to https:// while no certificate is issued, visitors see a security warning and you may be locked out of wp-admin. To undo it, add define( 'WP_HOME', 'http://yourdomain.com' ); and define( 'WP_SITEURL', 'http://yourdomain.com' ); to wp-config.php, then remove them once SSL is working.
9. First settings after install
- Permalinks. Go to Settings › Permalinks and choose Post name for clean URLs. If pages then show "404 Not Found", see How to create a default .htaccess file for WordPress.
- Caching. Our shared hosting runs the Apache web server, so use a cache plugin that works with Apache, such as WP Super Cache or W3 Total Cache.
- Email from WordPress. Some PHP functions that SMTP plugins rely on are disabled on shared hosting. Read PHP disabled functions on shared hosting and PHP sendmail settings before choosing a mail plugin.
- Uploads. If a large theme or media file fails to upload, see PHP upload file-size limit.
- Backups. Shared hosting includes weekly backups. Before big changes, such as a theme switch or a major update, also download your own copy of the files and database.
Next steps for building the site itself are in Mastering WordPress: a step-by-step guide.
10. Which Domain India hosting fits a WordPress site
Any of our Linux shared hosting plans runs WordPress. Every plan includes MySQL databases, free SSL, SSH access, WP-CLI and the Imunify360 security stack. The two starting points:
- 25 GB NVMe SSD Storage
- 50 GB Monthly Bandwidth
- 1 Website
- 10 Email Accounts
- 10 GB NVMe SSD Storage
- 50 GB Monthly Bandwidth
- 1 Website
- 5 Email Accounts
cPanel Starter gives you 25 GB NVMe storage and 5 MySQL databases for one website. DA Starter is the lower-cost option with 10 GB NVMe storage. Both include Softaculous for one-click installs, and cPanel also has WP Toolkit. If you plan to run several WordPress sites, look at the Growth plans, which allow 5 websites. Prices on the cards are live; on 19 September 2026 they started at ₹125 a month for cPanel and ₹100 a month for DirectAdmin, excluding 18% GST. Most hosting accounts are created automatically within a couple of minutes of payment; a small number need a manual check and take longer.
If you would rather not manage WordPress, plugins and updates at all, the AI Website Builder builds and hosts a business site for you.
How long does a manual WordPress install take?
About 15 minutes for most people: a few minutes to download and upload WordPress, a few to create the database and user, and a few for the WordPress installer itself. An app installer such as Softaculous or WP Toolkit does the same job in 2 to 3 minutes.
What database host should I enter for WordPress on Domain India shared hosting?
Enter localhost. WordPress and MySQL run on the same shared server. The database name and username must include your account prefix, for example cpanelusername_wp1.
Why does the WordPress installer say it cannot connect to the database?
Usually one of the four values is wrong (database name, username, password or host), or the user was never added to the database with all privileges. In cPanel, check Manage My Databases and use Add User To Database if the user is not listed under the database.
What file permissions should WordPress use?
Folders should be 755 and files 644. wp-config.php can be tightened to 640 or 600 because it holds your database password. Never use 777 on any file or folder.
Why should I change the WordPress table prefix?
Many automated attacks assume the default wp_ prefix. A unique prefix, set during installation, makes those attacks fail. Changing it after installation is possible but needs database edits, so it is easiest to do at install time.
When should I switch my WordPress site to HTTPS?
Only after the SSL certificate has been issued for your domain. Open https://yourdomain.com first; if it loads with a padlock, change both addresses in Settings › General to https and then turn on an HTTPS redirect.
Can I install WordPress in a subfolder instead of the main domain?
Yes. Extract WordPress into a folder inside public_html, for example blog, and leave the files there instead of moving them up. The site then runs at yourdomain.com/blog.
How do I get help if the install fails?
Open a support ticket from the client area or at domainindia.com/support/ticket, or use the 24/7 live chat. Tickets get a first response within 15 minutes; how long a fix takes depends on the issue.
Ready to install? Sign in and open My Hosting to reach your control panel. Need hosting first? Compare cPanel hosting and DirectAdmin hosting. Stuck on a step? Open a support ticket.
Free SSL, MySQL databases, File Manager and server-wide Imunify360 security on every shared hosting plan.
See cPanel plans