On Domain India DirectAdmin hosting, you restore backups yourself with JetBackup 5, inside DirectAdmin. You can bring back a single file, one database, a mailbox, DNS records, or the whole account, from any of the last five weekly backups. This guide covers the DirectAdmin side.
Log in to DirectAdmin and open JetBackup 5 (use the search box if it is not on the first screen). Pick what you need back and a date from before the problem, then choose Restore. The job runs from JetBackup's queue. Backups are taken weekly, early on Sunday morning, and the last 5 are kept.
JetBackup works the same way on our cPanel and DirectAdmin servers. For the schedule, downloads and keeping your own copies, read Backup and restore with JetBackup. For every restore type in detail, see the JetBackup 5 restore guide.
1. Open JetBackup 5 in DirectAdmin
Log in to DirectAdmin and open JetBackup 5. If you do not see it on the first screen, type "JetBackup" in the search box. If you still cannot find it, ask support.
2. Choose what to restore
Each weekly backup holds every part of your account, and you can restore each part on its own:
- Full Backups: everything at once. Use it only when the whole account must go back to one date.
- Home Directory: your files, including a single file or folder.
- Databases and Database Users: one MySQL database, and the users that connect to it.
- Email Accounts: mailboxes and their messages.
- Cron Jobs, Domains, Certificates and FTP Accounts.
Restoring only the part that is broken is safer, because everything else stays as it is now.
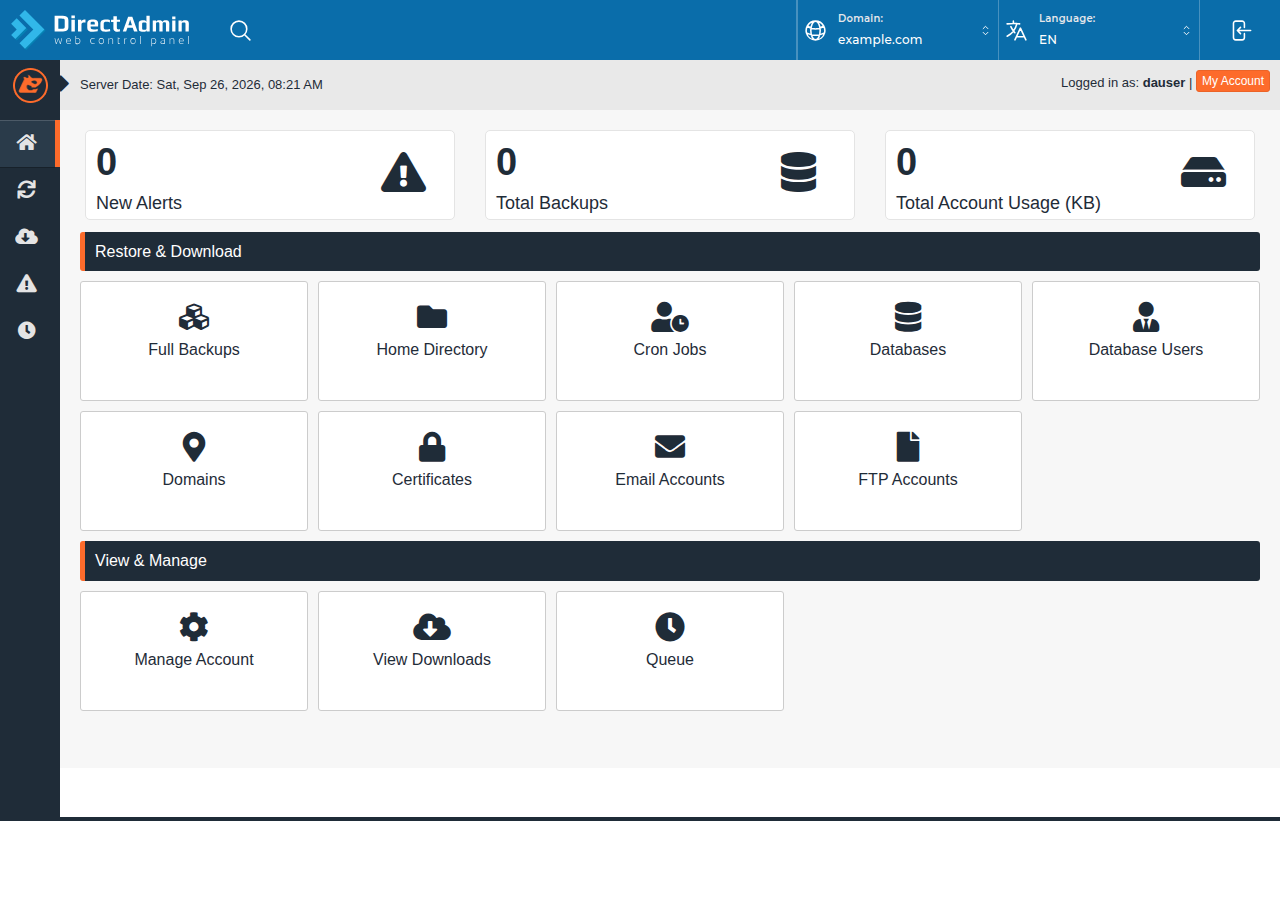
3. Restore
- Pick the type.Open the section you need, for example Home Directory or Databases.
- Pick the date.Choose a backup from before the problem started.
- Select the items.Browse to the file or folder, or tick the database or mailbox.
- Choose Restore and confirm.The job is added to JetBackup's queue.
- Wait for completion.Watch the queue and test your site only when the job is marked complete.
A database restore replaces the whole current database, and a file restore replaces the current copies of those files. Before you restore a database, export the current one in phpMyAdmin if you might need anything in it.
4. After restoring on DirectAdmin
- Test the site and any forms, logins or checkout.
- Check your configuration file, such as
wp-config.php, if the site shows a database connection error. The database name, user and password must match the account. - Check email by sending and receiving a test message.
- Clear caches in WordPress or any caching plugin.
On DirectAdmin, the File Manager helps you check restored files and fix permissions; see the DirectAdmin File Manager guide.
5. If it does not work
- The date you want is missing. Only the last 5 weekly backups are kept; older ones have rolled out.
- The restore fails. Your account may be near its disk quota. Free space, then try again or try an earlier date.
- The site was hacked. The backup may already contain the malware. Read what to do if your website has been hacked before you restore.
Frequently asked questions
Where is JetBackup in DirectAdmin?
Log in to DirectAdmin and open JetBackup 5. If it is not on the first screen, type JetBackup in the search box. If you still cannot find it, ask Domain India support.
How far back can I restore on Domain India DirectAdmin hosting?
JetBackup 5 takes a weekly backup early on Sunday morning and keeps the last 5, so you can restore from roughly the last five weeks.
Can I restore one file or one database?
Yes. Open Home Directory to restore a file or folder, or Databases to restore one database. You do not need a full account restore.
Why does my restore not start at once?
JetBackup runs restores from a queue. Open the queue in JetBackup 5 to watch progress, and wait until the job is complete before testing.
Stuck? Read the full JetBackup guide or open a support ticket with the domain, what you need restored and the date it last worked. Our team is on 24/7 live chat too.
Tell us the domain, what you need restored and the date it last worked, and we will help you pick the right backup.
Open a support ticket