The Domain India client area is where you manage everything you buy from us: domains, hosting, VPS, the App Platform, the AI Website Builder and Business Email, plus invoices, support tickets and the security of your account. This guide walks through each part of it, where to find it, and what to set up first.
Sign in at /client/login. The left-hand menu has ten sections: Dashboard, Domains, Hosting, VPS & Servers, App Platform, AI Website Builder, Business Email, Billing, Support and Account. Start by completing your profile and GST details, turning on two-factor authentication under Account › Security, and adding staff under Account › Team members instead of sharing your password. Domain India never charges a card automatically: every renewal is an invoice you pay.
1. Signing in
Go to /client/login and enter the email address and password on your account. If you signed up with Google, use Sign in with Google instead.
- Forgotten password: use Forgot password? on the sign-in page, enter your account email and follow the link we send you.
- Two-factor authentication: if it is on, you are asked for a six-digit code from your authenticator app after your password.
- Too many wrong attempts can block your IP address for a while. See resolving temporary IP blocks.
The client-area login is separate from your control panel login (cPanel, DirectAdmin, Webuzo or Plesk). For the panel, see how to log in to cPanel.
2. The dashboard and the menu
The Dashboard is your overview: your services, anything due for payment, and quick actions. Order New and Additional Services (add-ons for your existing services) are reached from the dashboard and from each list's header.
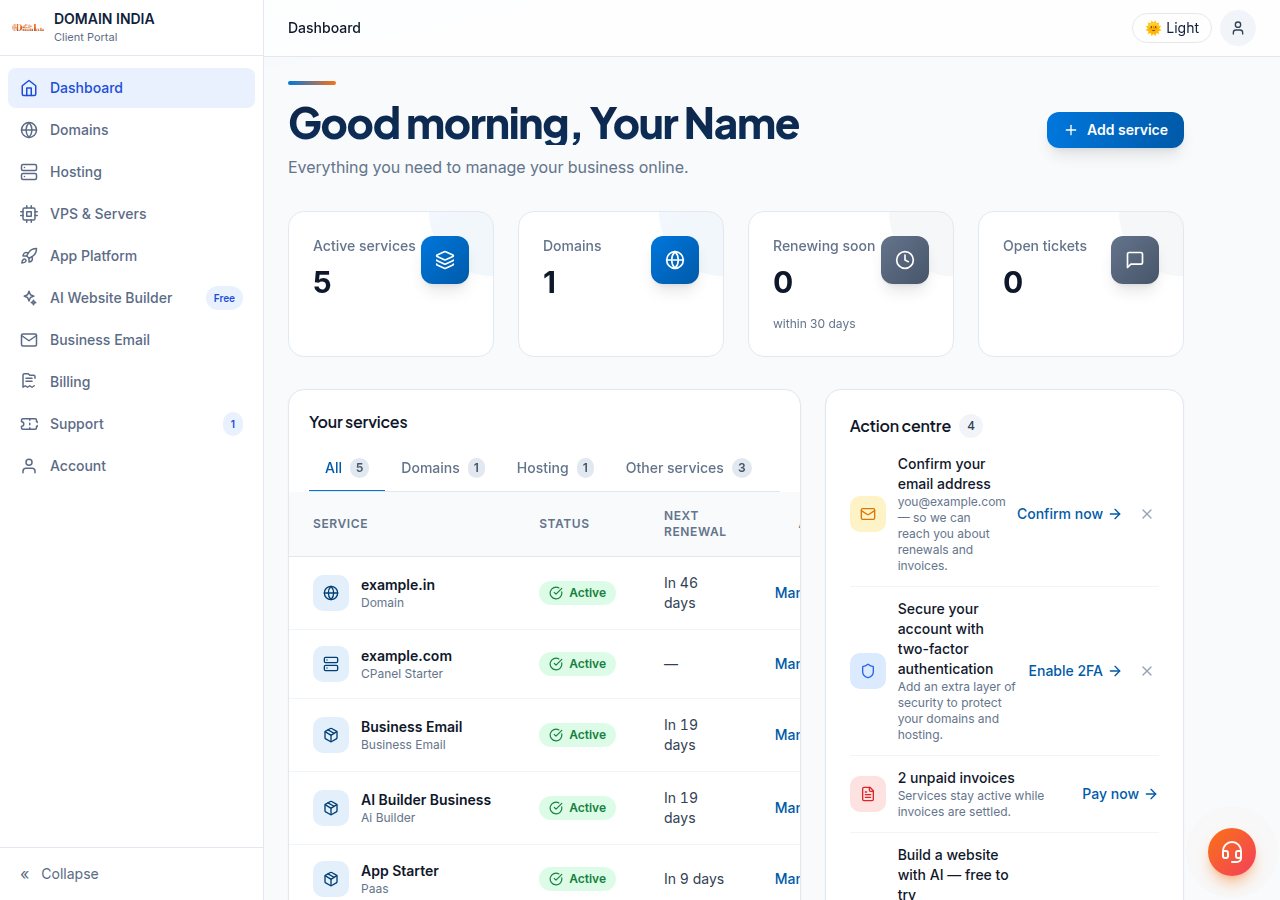
| Menu section | What you do there | Tabs inside |
|---|---|---|
| Dashboard | Overview of services and quick actions | None |
| Domains | Renew, change nameservers, lock, privacy and contacts | My domains, Contact profiles, DNS tools |
| Hosting | Open your control panel, see login details, upgrade | My hosting, Reseller hosting |
| VPS & Servers | Your virtual servers | None |
| App Platform | Deploy and manage applications | None |
| AI Website Builder | Build and publish a site with AI | None |
| Business Email | Mailboxes on your own domain | None |
| Billing | Pay and download invoices, see orders and payments | Invoices, Orders, Payments, Renewals, Billing address |
| Support | Tickets and help articles | My tickets, Knowledgebase, Announcements |
| Account | Profile, identity, security, team and email records | Profile, Identity verification, Security, Team members, Email history, Affiliate |
3. Your profile, billing address and GST details
Open Account › Profile and click Edit profile to update your name, email address, phone number, company, postal address and country.
- GST: if your business is GST-registered, enter your 15-character GSTIN in the GST information card, so your invoices carry it. Leave it blank if you are not registered.
- Billing address: the address used on invoices and for payments is under Billing › Billing address.
- Your email address matters most. Invoices, renewal reminders, security notices and ticket replies all go there. Keep it current, and if a change will not save, open a ticket.
Domain registrant details (the WHOIS contacts on a domain) are separate from your account profile. Manage them under Domains › Contact profiles, or see how to change your domain's WHOIS information.
4. Security: two-factor, password and Google sign-in
- Turn on two-factor authentication.Go to Account › Security (/client/security/2fa), click Enable 2FA, confirm your password, scan the QR code with an authenticator app such as Google Authenticator, Authy or Microsoft Authenticator, save the recovery codes and enter the six-digit code. You are signed out and sign in again with a code. The full guide is how to enable two-factor authentication.
- Use a strong, unique password.Change it at /client/security/password: enter your current password, then the new one twice.
- Decide on Google sign-in.The Profile page has a switch, Allow signing in with Google. Turn it off if you want only password-plus-code sign-ins.
- Remember devices only on your own computer.On the code screen, Remember this device for 30 days skips the code on that browser. Leave it unticked on shared or office machines.
Don't give your password to a web designer, accountant or employee. Add them as a team member instead (section 5), so each person has their own login and you can remove access at any time.
5. Team members
Account › Team members lists the staff who can sign in to your account and what each one may do.
- Invite a member: click Invite member, enter their name and email, choose their permissions and send the invitation. They get an email with a link to set their own password.
- Change what they can do: use Edit permissions on their row.
- Pause or end access: Suspend stops them signing in until you Reactivate them; Remove takes their access away permanently.
The list shows each member's status (Active, Pending or Suspended) and when they last signed in.
6. Managing your services
- Domains: open a domain to renew it, change nameservers, check the transfer lock and WHOIS privacy on its Security card, and manage contacts. To point a domain at your hosting, see how to change your nameservers.
- Hosting: open a plan and choose Manage. The Access tab shows your username, server IP and panel address, with a button to reset the control panel password. Lost the welcome email? See getting your welcome email again. Webuzo users should ask support for password resets.
- VPS & Servers, App Platform, AI Website Builder and Business Email each have their own section with the tools for that product.
- Upgrades: to move to a bigger hosting plan, see upgrading your hosting package.
7. Billing: invoices, payments and renewals
| Tab | What it shows |
|---|---|
| Invoices | Every invoice with its status. Open an unpaid one to pay online, or download a PDF |
| Orders | Everything you have ordered and its status |
| Payments | Every payment received on the account |
| Renewals | What renews when and what it costs, with a switch to decline a renewal |
| Billing address | The address printed on your invoices |
Domain India never charges a saved card automatically. Before a service is due, we generate a renewal invoice, up to 30 days ahead, and email it to you. The service renews only when you pay it. If you don't want a service to renew, choose Don't renew on the Renewals tab, or simply leave the invoice unpaid. See how auto-renewal works.
8. Support and your email record
- Open a ticket at /client/support/new and follow its replies under Support › My tickets. Live chat is available 24/7, and tickets get a first response within 15 minutes; resolving the issue can take longer. There is no phone support.
- Knowledgebase and Announcements are under Support too.
- Email history (Account › Email history) lists the emails we have sent to your account, such as invoices, reminders and ticket replies. Emails that carry passwords or login details are not kept there; find those details on the service's page in the client area instead. For older emails, the subject and date are kept but not the full message.
- Email preferences (/client/preferences/email) explains what we send. Billing, security, service and ticket emails can't be switched off; to stop offers and newsletters, use the button there to ask us.
9. Identity verification and closing your account
Account › Identity verification (/client/kyc) is where you complete eKYC for .in domains, through DigiLocker. Verification belongs to your account, once. See complete eKYC verification.
If you ever want to close your account, the Profile page has a Danger zone card. Closing is permanent once our team has confirmed it with you, so download your website files, databases and email, and transfer out any domains you want to keep, first.
10. Where Domain India fits
One client area covers every Domain India product. If you are just starting, register a domain at domain registration and add hosting such as cPanel hosting; both then appear in the same account, on the same invoices, under the same login.
Where do I log in to the Domain India client area?
At domainindia.com/client/login, with your account email and password or with Google if you signed up that way. Your control panel (cPanel, DirectAdmin, Webuzo or Plesk) has its own separate login.
How do I turn on two-factor authentication for my account?
Open Account, Security in the client area, click Enable 2FA, confirm your password, scan the QR code with an authenticator app, save your recovery codes and enter the six-digit code. From then on every sign-in asks for a code.
Can my staff or web designer use my account without my password?
Yes. Invite them under Account, Team members with the permissions they need. Each person gets their own login, and you can suspend or remove their access at any time.
Does Domain India charge my card automatically for renewals?
No. Domain India never charges a saved card. A renewal invoice is generated and emailed before the due date, and the service renews only when you pay it.
Where can I find an email you sent me that I deleted?
Open Account, Email history. It lists the emails sent to your account, except those that carry passwords or login details. For older emails the subject and date are kept but not the full message.
How do I add my GST number to invoices?
Open Account, Profile, click Edit profile and enter your 15-character GSTIN in the GST information card, then save.
Ready to set up your account properly? Sign in at the client area, turn on two-factor authentication, or open a ticket if anything is not where this guide says.
Domains, hosting, email, invoices and support, under one login protected by two-factor authentication.
Sign in to the client area