To create an email account in DirectAdmin, open E-mail Manager › E-mail Accounts, click Create Account, enter the part before the @, a password and a quota, and click CREATE ACCOUNT on the form. The address works straight away, but mail only arrives once your domain's MX record points to your DirectAdmin hosting. This page gives the DirectAdmin steps and the settings you need next.
Creating addresses on cPanel, Webuzo and Business Email, choosing quotas and fixing DNS are covered in How to create email accounts for your domain.
In DirectAdmin, go to E-mail Manager › E-mail Accounts › Create Account. Enter the username (the part before the @), a strong password and a mailbox quota, then click CREATE ACCOUNT. Sign in at https://yourdomain.com/webmail with the full email address, or add it to a mail app with IMAP on port 993 and SMTP on port 465, both SSL/TLS, server mail.yourdomain.com.
1. Create the account
- Log in to DirectAdmin.Use the DirectAdmin button on your hosting service in the client area; see DirectAdmin login.
- Open E-mail Accounts.Go to E-mail Manager › E-mail Accounts. If you host more than one domain, check the domain selector first.
- Click CREATE ACCOUNT.The form that opens is titled Create Mail Account.
- Fill in the details.Username (for example
info), a long unique password, and a quota in MB. An optional send limit caps how many messages this address may send per day. - Click CREATE ACCOUNT.The mailbox is ready. Copy the password somewhere safe.
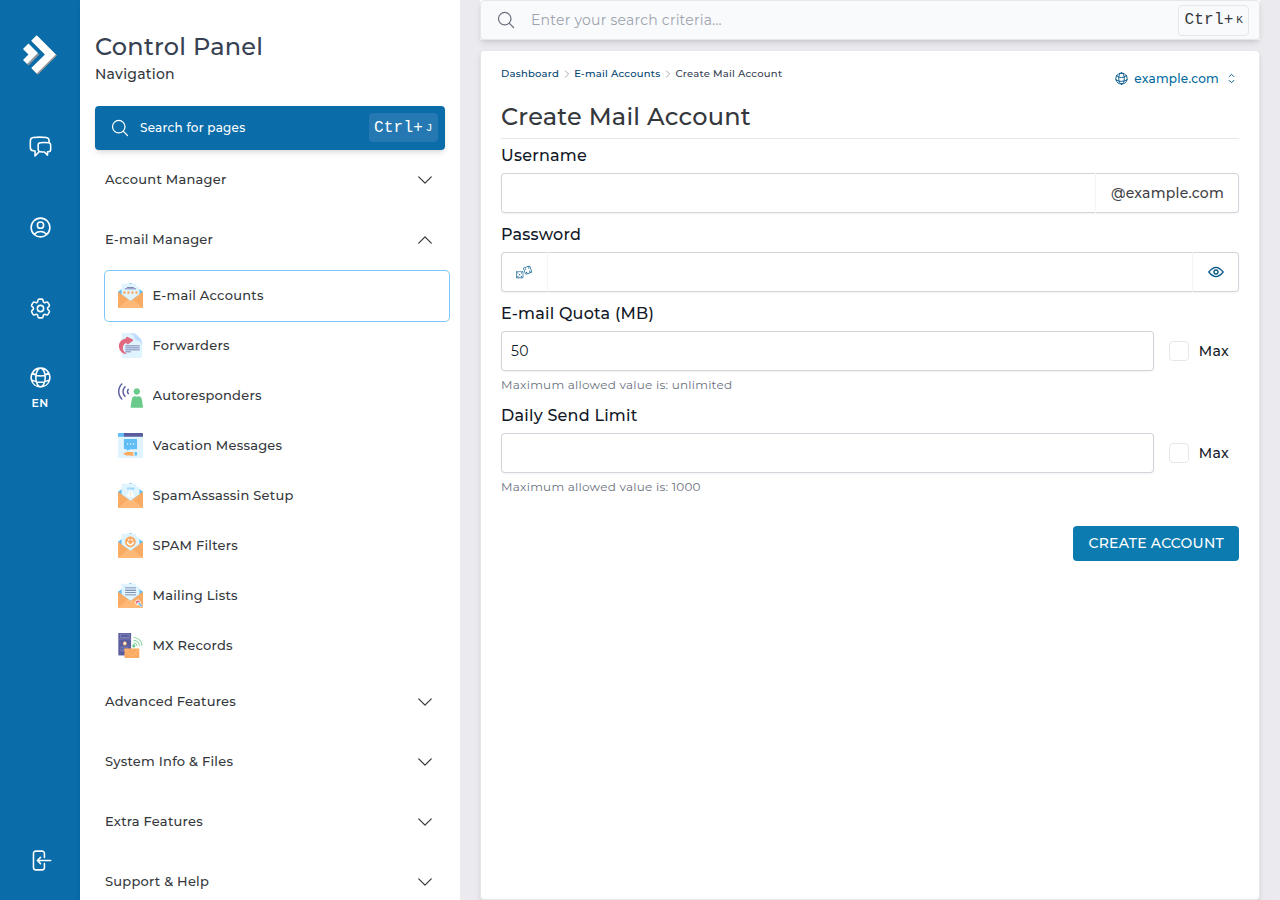
To change a password or quota later, click Modify next to the account on the same page. Deleting an account deletes all the mail stored in it, so save anything important first.
Every mailbox shares your plan's disk space with your website and databases. A fixed quota per mailbox stops one busy inbox from filling the whole account. See managing email quotas.
2. How many addresses your plan includes
| Plan | Email accounts |
|---|---|
| DA Starter | 5 |
| DA Growth | 50 |
| DA Business | 250 |
These are Domain India plan limits on 19 September 2026. Forwarders don't use up a mailbox; see email forwarders in DirectAdmin.
- 10 GB NVMe SSD Storage
- 50 GB Monthly Bandwidth
- 1 Website
- 5 Email Accounts
Prices on the cards exclude 18% GST.
3. Read your mail
- Webmail:
https://yourdomain.com/webmailorhttps://yourdomain.com/roundcube. The addresswebmail.yourdomain.comdoes not exist on DirectAdmin hosting. Roundcube on DirectAdmin also has Filters and Out of Office in its settings. - Mail apps: use these settings with your full email address as the username.
| Setting | Server | Port and encryption |
|---|---|---|
| Incoming, IMAP (recommended) | mail.yourdomain.com | 993, SSL/TLS |
| Incoming, POP3 | mail.yourdomain.com | 995, SSL/TLS |
| Outgoing, SMTP | mail.yourdomain.com | 465 SSL/TLS, or 587 STARTTLS |
App-by-app steps are in email client settings for DirectAdmin.
4. Good to know on DirectAdmin
- SPF and DKIM are usually already there. On our DirectAdmin server, 2,535 of 2,553 DNS zones have an SPF record and 2,377 have a DKIM key under the selector
x(checked 24 September 2026). If your domain uses outside nameservers, copy both records to your DNS host. See DKIM in DirectAdmin. - DMARC is not added for you. Add a
_dmarcTXT record yourself if you want one. - Sending limit: 1,000 messages per day per account. Use a dedicated email service for newsletters.
- Largest message: 50 MB, including attachments.
Frequently asked questions
How do I create an email account in DirectAdmin?
Log in to DirectAdmin, open E-mail Manager, then E-mail Accounts, and click Create Account. Enter the part before the @, a strong password and a quota in MB, then click CREATE ACCOUNT. The address works immediately.
How many email accounts can I create on DirectAdmin hosting?
DA Starter includes 5 email accounts, DA Growth 50 and DA Business 250. Forwarders do not count as mailboxes.
What is the webmail address for DirectAdmin email?
Open https://yourdomain.com/webmail or https://yourdomain.com/roundcube and sign in with the full email address and its password. webmail.yourdomain.com does not exist on DirectAdmin hosting.
What mail server settings do I use in Outlook or on my phone?
Use mail.yourdomain.com with IMAP on port 993 and SMTP on port 465, both SSL/TLS, or SMTP on 587 with STARTTLS. The username is the full email address.
I created the account but no mail arrives. Why?
Mail goes to whichever server your domain's MX record points to. If it still points to an old provider, new mail goes there. Check the MX record first, then check the mailbox is not over its quota.
Ready to set up your mailboxes? Log in from your hosting services, follow the full guide in How to create email accounts for your domain, or open a support ticket if mail doesn't arrive.
Tell us the email address and the time of a message that did not arrive, and we will check it on the server.
Open a support ticket