You can use Google Workspace for the email on a domain registered with Domain India while your website stays on your hosting. Setting it up is a DNS job: verify the domain with Google, point the MX record at Google, and publish SPF, DKIM and DMARC records wherever your domain's DNS is managed. This page gives the short version; the full guide covers every record and the hosting settings people forget.
Every record, where to add it in each control panel, and a troubleshooting table are in Google Workspace email configuration: the complete guide. Domain India does not sell Google Workspace: you subscribe with Google, and Google supports your Workspace account. This guide does not apply to Domain India Business Email.
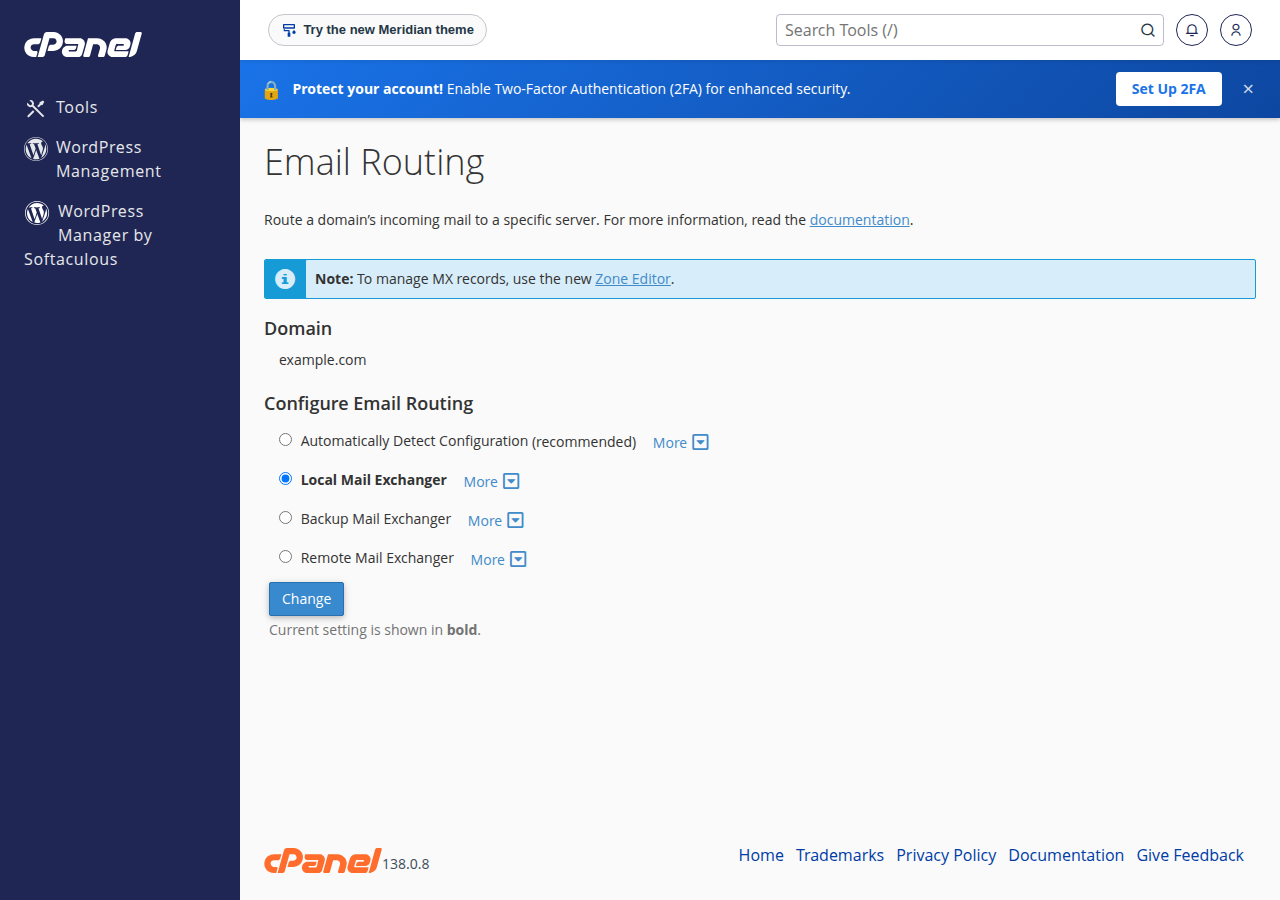
Add Google's google-site-verification TXT record and verify the domain in the Admin console. Set the MX record to smtp.google.com with priority 1 (older setups with the five aspmx.l.google.com records still work) and delete every other MX record. Publish one SPF record containing include:_spf.google.com, the DKIM TXT record the Admin console generates, and a DMARC record at _dmarc. On cPanel hosting, set Email Routing to Remote Mail Exchanger so your website's own mail reaches Google.
1. Find where your DNS is managed
Records only work where your domain's DNS is actually managed. If the domain uses your hosting nameservers, add them in your control panel, such as cPanel's Zone Editor. If it uses another provider, such as Cloudflare, add them there; records added anywhere else are ignored. How to change your domain DNS settings shows how to check.
Before you switch, create your users in Google Workspace and copy out any mail you want to keep from your hosting mailboxes. Once MX points to Google, those mailboxes stop receiving new mail.
2. The records to add
| Record | Name | Value |
|---|---|---|
| TXT (verification) | @ | The google-site-verification value from the Admin console |
| MX | @ | smtp.google.com, priority 1 |
| TXT (SPF) | @ | v=spf1 include:_spf.google.com ~all |
| TXT (DKIM) | google._domainkey (as Google shows) | The key generated in the Admin console, starting v=DKIM1 |
| TXT (DMARC) | _dmarc | v=DMARC1; p=none; rua=mailto:[email protected] |
- Verify the domain.Add the verification TXT record, then click Verify in the Google Admin console.
- Switch MX.Add Google's MX record and delete every other MX record for the domain, including the one pointing at your hosting server. Mixed MX records split your mail between two places.
- Merge SPF.A domain may have only one SPF record. If one exists, add
include:_spf.google.comto it; if your website also sends mail from your hosting server, keep that server in the same record. - Turn on DKIM.In the Admin console, open Apps › Google Workspace › Gmail › Authenticate email, generate the record, publish it as a TXT record, then click Start authentication.
- Add DMARC.Start with
p=noneto monitor, and tighten toquarantineorrejectonce every service that sends as your domain passes.
Your hosting server still thinks it handles your domain's mail, so contact-form messages your website sends to your own addresses can land in the old hosting mailbox. In cPanel, open Email › Email Routing and choose Remote Mail Exchanger. On DirectAdmin, Webuzo or Windows (Plesk), ask support to set the domain's mail as remote if you cannot find the setting.
3. Test it
Send a message from an outside address to a Workspace user and reply. In Gmail, open the message menu, choose Show original, and check that SPF, DKIM and DMARC all show PASS. DNS changes can take a few hours, and sometimes up to 48 hours, to be seen everywhere; during that time some mail may still reach the old server.
What MX record does Google Workspace use?
Google tells new setups to use a single MX record, smtp.google.com, with priority 1. The older set of five aspmx.l.google.com records still works. Use what your Google Admin console shows and delete all other MX records.
Where do I add Google Workspace records for a Domain India domain?
Wherever the domain's DNS is managed. If it uses your hosting nameservers, add them in your control panel, for example cPanel's Zone Editor. If it uses another DNS provider, add them there.
Is the Google Workspace DKIM record a CNAME?
No. It is a TXT record containing a key generated for your domain in the Admin console, usually published at google._domainkey. After publishing it, click Start authentication.
Why does mail from my own website not reach Google Workspace?
The hosting server may still deliver your domain's mail to its own mailboxes. In cPanel, set Email Routing to Remote Mail Exchanger for the domain. In DirectAdmin, untick Use this server to handle my e-mails under E-mail Manager, MX Records. In Webuzo, choose Remote Mail Server under Email, Email Router.
Does Domain India sell Google Workspace?
No. Google Workspace is bought from Google. Domain India provides domains, hosting with included email, and a separate Business Email product priced per mailbox.
Ready to connect your domain? Follow the complete Google Workspace guide, or compare Business Email if you would rather keep email with Domain India. Need help finding where your DNS is managed? Open a support ticket.
Mailboxes at your own domain, priced per mailbox, with webmail and IMAP and SMTP over TLS.
See Business Email