A task manager is the classic first Laravel project: users sign up, log in, and create, edit, complete and delete their own tasks. It touches everything you need for real work, including migrations, Eloquent relationships, validation, authorisation and Blade views. This guide builds it on your own computer and then deploys it to Domain India cPanel hosting the way that works reliably on shared servers.
Build and test the app locally with a current Laravel release and a starter kit for login. Scope every query to the logged-in user and use a policy so nobody can edit another person's tasks. Then build the production files on your computer and upload them, or run Composer over jailed SSH, because Composer scripts and some artisan commands need PHP functions that shared hosting disables. Our full deployment guide is Laravel on cPanel and DirectAdmin.
1. What you need
- PHP, Composer, Node.js and MySQL (or SQLite for quick local testing) on your own computer. Laravel's documentation lists the PHP version each release requires.
- A current Laravel release. The code below uses features found in Laravel 11 and later, so check the Laravel documentation for the version in active support.
- A Domain India cPanel, DirectAdmin or Webuzo hosting account with a MySQL database for the live site.
Domain India shared servers disable PHP functions such as proc_open, which Composer scripts and some artisan commands rely on, and the restriction applies on the command line too. Do the Composer and npm work on your computer and upload the result, or run composer.phar over jailed SSH with --no-scripts if it stops with a proc_open message. The list is in PHP disabled functions on shared hosting.
2. Create the project with login built in
Laravel's installer creates a new app and offers a starter kit that includes registration, login and password reset. Pick the Livewire, React or Vue kit, whichever you prefer; the task code below works with any of them.
composer global require laravel/installer
laravel new task-manager
cd task-manager
npm install && npm run build
php artisan serve
Open http://127.0.0.1:8000, register a user and confirm you can log in. Older tutorials use laravel/ui with php artisan ui bootstrap --auth. That package is legacy, so use the current starter kits instead.
3. The Task model and migration
php artisan make:model Task -mEdit the new migration in database/migrations/:
public function up(): void
{
    Schema::create('tasks', function (Blueprint $table) {
        $table->id();
        $table->foreignId('user_id')->constrained()->cascadeOnDelete();
        $table->string('title');
        $table->text('description')->nullable();
        $table->boolean('is_completed')->default(false);
        $table->timestamps();
    });
}
foreignId()->constrained() creates the column, the index and the foreign key in one line, and deleting a user deletes their tasks. Run php artisan migrate.
In app/Models/Task.php, allow only the fields users may set, and cast the flag to a boolean:
class Task extends Model
{
    protected $fillable = ['title', 'description', 'is_completed'];

    protected function casts(): array
    {
        return ['is_completed' => 'boolean'];
    }

    public function user(): BelongsTo
    {
        return $this->belongsTo(User::class);
    }
}
In app/Models/User.php, add the other side of the relationship:
public function tasks(): HasMany
{
    return $this->hasMany(Task::class);
}
Import BelongsTo and HasMany from Illuminate\Database\Eloquent\Relations. user_id is deliberately not fillable: the app sets it from the logged-in user, never from the form.
4. Stop users touching each other's tasks
The original version of this tutorial let any logged-in user edit any task by changing the ID in the URL. A policy fixes that:
php artisan make:policy TaskPolicy --model=TaskReplace the generated methods you need with an ownership check:
public function update(User $user, Task $task): bool
{
    return $task->user_id === $user->id;
}

public function delete(User $user, Task $task): bool
{
    return $task->user_id === $user->id;
}
Laravel finds TaskPolicy automatically because it matches the model name.
5. Routes and the controller
In routes/web.php:
use App\Http\Controllers\TaskController;

Route::middleware('auth')->group(function () {
    Route::resource('tasks', TaskController::class)->except(['show', 'create']);
});
Create the controller with php artisan make:controller TaskController --resource and fill in the methods:
use App\Models\Task;
use Illuminate\Http\Request;
use Illuminate\Support\Facades\Gate;

class TaskController extends Controller
{
    public function index(Request $request)
    {
        $tasks = $request->user()->tasks()->latest()->get();
        return view('tasks.index', compact('tasks'));
    }

    public function store(Request $request)
    {
        $data = $request->validate([
            'title' => ['required', 'string', 'max:255'],
            'description' => ['nullable', 'string'],
        ]);
        $request->user()->tasks()->create($data);
        return redirect()->route('tasks.index')->with('status', 'Task created.');
    }

    public function edit(Task $task)
    {
        Gate::authorize('update', $task);
        return view('tasks.edit', compact('task'));
    }

    public function update(Request $request, Task $task)
    {
        Gate::authorize('update', $task);
        $data = $request->validate([
            'title' => ['required', 'string', 'max:255'],
            'description' => ['nullable', 'string'],
        ]);
        $data['is_completed'] = $request->boolean('is_completed');
        $task->update($data);
        return redirect()->route('tasks.index')->with('status', 'Task updated.');
    }

    public function destroy(Task $task)
    {
        Gate::authorize('delete', $task);
        $task->delete();
        return redirect()->route('tasks.index')->with('status', 'Task deleted.');
    }
}
Three habits here matter more than the task manager itself: save only validated data, never $request->all(); create records through the relationship so user_id comes from the session; and authorise every action on an existing record.
6. The Blade views
Create resources/views/tasks/index.blade.php. This minimal version stands alone; wrap it in your starter kit's layout component when you style the app.
<h1>Welcome, {{ auth()->user()->name }}</h1>

@if (session('status')) <p>{{ session('status') }}</p> @endif

<form method="POST" action="{{ route('tasks.store') }}">
    @csrf
    <input name="title" value="{{ old('title') }}" required maxlength="255">
    <textarea name="description">{{ old('description') }}</textarea>
    @error('title') <p>{{ $message }}</p> @enderror
    <button type="submit">Add task</button>
</form>

@forelse ($tasks as $task)
    <div>
        <strong @class(['done' => $task->is_completed])>{{ $task->title }}</strong>
        <a href="{{ route('tasks.edit', $task) }}">Edit</a>
        <form method="POST" action="{{ route('tasks.destroy', $task) }}">
            @csrf @method('DELETE')
            <button type="submit">Delete</button>
        </form>
    </div>
@empty
    <p>No tasks yet.</p>
@endforelse
resources/views/tasks/edit.blade.php is a form that posts to route('tasks.update', $task) with @csrf, @method('PUT'), the title and description fields, and a checkbox named is_completed. Blade's {{ }} escapes output, which protects you from script injection in task titles; avoid {!! !!} for anything a user typed.
Test locally: register two users, create tasks as each, and confirm that user B gets a 403 when opening user A's edit URL.
7. Deploy to Domain India shared hosting
Follow Path A in Laravel on cPanel and DirectAdmin. In short:
- Build on your computer.Run
composer install --no-dev --optimize-autoloaderandnpm run build. - Upload outside the web root.Zip the project with
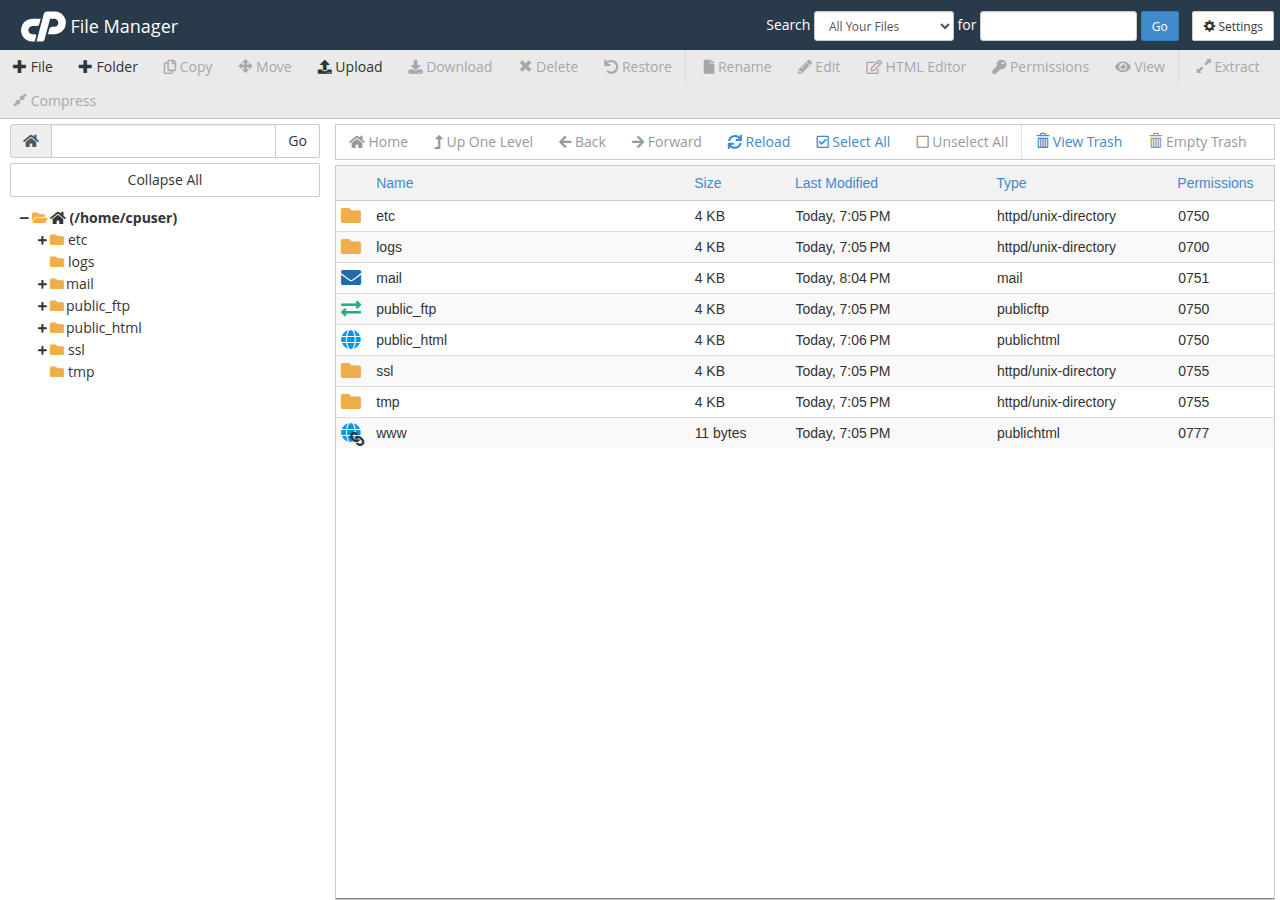
vendor/and without.git,node_modulesand your local.env. Upload it to a folder such as~/task-manager, extract it with File Manager, and put only the contents ofpublic/inpublic_html, updating the two paths inpublic_html/index.php. - Create the database.Make a MySQL database and user in your control panel.
- Write the production
.env.SetAPP_ENV=production,APP_DEBUG=false,APP_URL,DB_HOST=localhost, your database name, user and password,SESSION_DRIVER=file,CACHE_STORE=fileandQUEUE_CONNECTION=sync. Generate the key locally withphp artisan key:generate --showand paste it in asAPP_KEY. - Create the tables.Run the migrations against a local copy of the database, export it to a
.sqlfile, and import that with phpMyAdmin. If SSH is enabled on your account,php artisan migrate --forcealso works. - Set permissions.
storage/andbootstrap/cache/at 755. Never 777.
Use localhost as the database host: MySQL port 3306 is closed from outside on every Domain India shared server. For a desktop database client, use an SSH tunnel.
8. Running this on Domain India
- Shared hosting fits this app. It is plain web requests, Blade and MySQL, with no queue workers or Redis. Our shared servers run Apache, and
.htaccessrules, including Laravel's own, work. - SSH. Jailed SSH access is available on every shared hosting plan (cPanel, DirectAdmin, Webuzo). It is off by default; ask support to enable it for your account. Log in with an SSH key. Tools available inside the jailed shell vary, so ask support before relying on one. See Enabling and accessing jailed SSH.
- When to move up. If you later add queue workers, Redis or websockets, you need a VPS, which is self-managed with full root access and no cPanel. The App Platform auto-detects Node.js apps; a PHP app like this one needs its own Dockerfile there.
- 25 GB NVMe SSD Storage
- 50 GB Monthly Bandwidth
- 1 Website
- 10 Email Accounts
The card shows the live Domain India list price, excluding 18% GST.
Can I run composer install on Domain India shared hosting?
Yes, over jailed SSH (on request). Composer isn't pre-installed, so download composer.phar and run php composer.phar install; if it stops with a proc_open message, run it again with --no-scripts, then run php artisan package:discover. Or run Composer on your own computer and upload the project with its vendor folder.
Which Laravel version should I use?
Use a release that is currently in Laravel's support window, and choose a PHP version in your control panel that meets its requirement. The code in this guide works on Laravel 11 and later.
How do I add login to a new Laravel app?
Choose a starter kit when you run laravel new. The current kits include registration, login and password reset. The older laravel/ui package is legacy and not needed for new projects.
How do I stop one user editing another user's tasks?
Load tasks through the logged-in user's relationship, set user_id from the session rather than the form, and authorise update and delete with a policy that compares the task's user_id with the current user's ID.
How do I run migrations without SSH?
Run them against a local database, export it to a .sql file and import it with phpMyAdmin in your control panel. If SSH is enabled on your account, php artisan migrate --force works too.
What database host do I use in .env on shared hosting?
Use localhost. MySQL port 3306 is closed from outside on every Domain India shared server, so remote connections need an SSH tunnel.
Ready to put your app online? Read the full Laravel deployment guide, compare cPanel hosting plans, or look at a VPS if your app needs background workers.
Shared hosting with PHP versions you choose in the panel, MySQL databases and free SSL, suited to Laravel apps built on your computer and uploaded.
See cPanel hosting