On Domain India DirectAdmin hosting, most sites never need to install a certificate by hand: DirectAdmin issues the free Let's Encrypt certificate by itself once the domain points at your hosting, and renews it by itself. You only need the manual route in this guide if you bought a certificate from another provider, for example an OV or EV certificate your organisation requires. This guide covers both, starting with the free option.
For almost every site, the free Let's Encrypt certificate is enough: DirectAdmin issues and renews it automatically, and you can confirm it under Account Manager › SSL/TLS Certificates. To install a certificate you bought elsewhere, create a private key and CSR with OpenSSL on your own computer or with your provider's tool, and send the CSR to the provider. Then open the "⋯" menu on the hostname's row, choose Upload custom certificate, and paste the private key, the certificate and the chain. Check that the key matches the certificate before you paste, and test the chain afterwards.
1. First, check whether you need a paid certificate at all
| Option | Cost | Renewal | Good for |
|---|---|---|---|
| Let's Encrypt in DirectAdmin | Free | Automatic | Almost every website, blog, shop or business site |
| Certificate bought elsewhere | The provider's price | You reinstall it by hand each time | A policy that requires an OV or EV certificate, or a specific certificate authority |
Let's Encrypt certificates are trusted by every modern browser and show the same padlock as paid domain-validated certificates. On our DirectAdmin server, certificates are issued automatically once the domain reaches the server, and they renew automatically well before they expire. The full walkthrough is in how to enable Let's Encrypt SSL in DirectAdmin.
Industry rules cut the maximum life of public SSL certificates to 200 days from March 2026, falling to 100 days in 2027 and 47 days in 2029. A certificate you install by hand must be reinstalled at least that often, while Let's Encrypt renews itself. Unless you have a specific reason for a paid certificate, the free one is less work.
Domain India does not sell SSL certificates; free SSL is included with the hosting. If you think you need a paid certificate, ask support first, or buy one from a certificate provider and install it as shown below.
2. What you need before you start
- The domain pointing at your DirectAdmin hosting. The certificate works only when visitors reach our server. Use the nameservers or the server IP from the Access tab of your hosting service in the client area; see how to change your nameservers.
- Access to DirectAdmin. Open it from your hosting services in the client area.
- A private key and a CSR (certificate signing request), created in step 3.
- From your provider, after issue: the certificate for your domain (a
.crtor PEM file) and the CA bundle (the intermediate certificates, sometimes called the chain).
3. Create the private key and CSR
DirectAdmin's SSL/TLS Certificates page has no CSR generator, so you create the private key and CSR outside the panel: with OpenSSL on your own computer, or with your certificate provider's tool. Keep the private key: the certificate will only work with the key that made the CSR.
With OpenSSL on your own computer:
openssl req -new -newkey rsa:2048 -nodes \
  -keyout example.com.key -out example.com.csr \
  -subj "/CN=example.com" \
  -addext "subjectAltName=DNS:example.com,DNS:www.example.com"
Replace example.com with your domain. Send the .csr file to your certificate provider and complete their validation. Store the .key file safely and never email it or paste it into a ticket.
Anyone with the private key can impersonate your site. If it leaks, ask your provider to revoke the certificate, create a new key and CSR, and have the certificate reissued.
4. Install the issued certificate
- Check the key matches the certificate.Run the two commands in section 5; the two outputs must be identical.
- Open Account Manager › SSL/TLS Certificates.In DirectAdmin, stay on the Manage certificates tab.
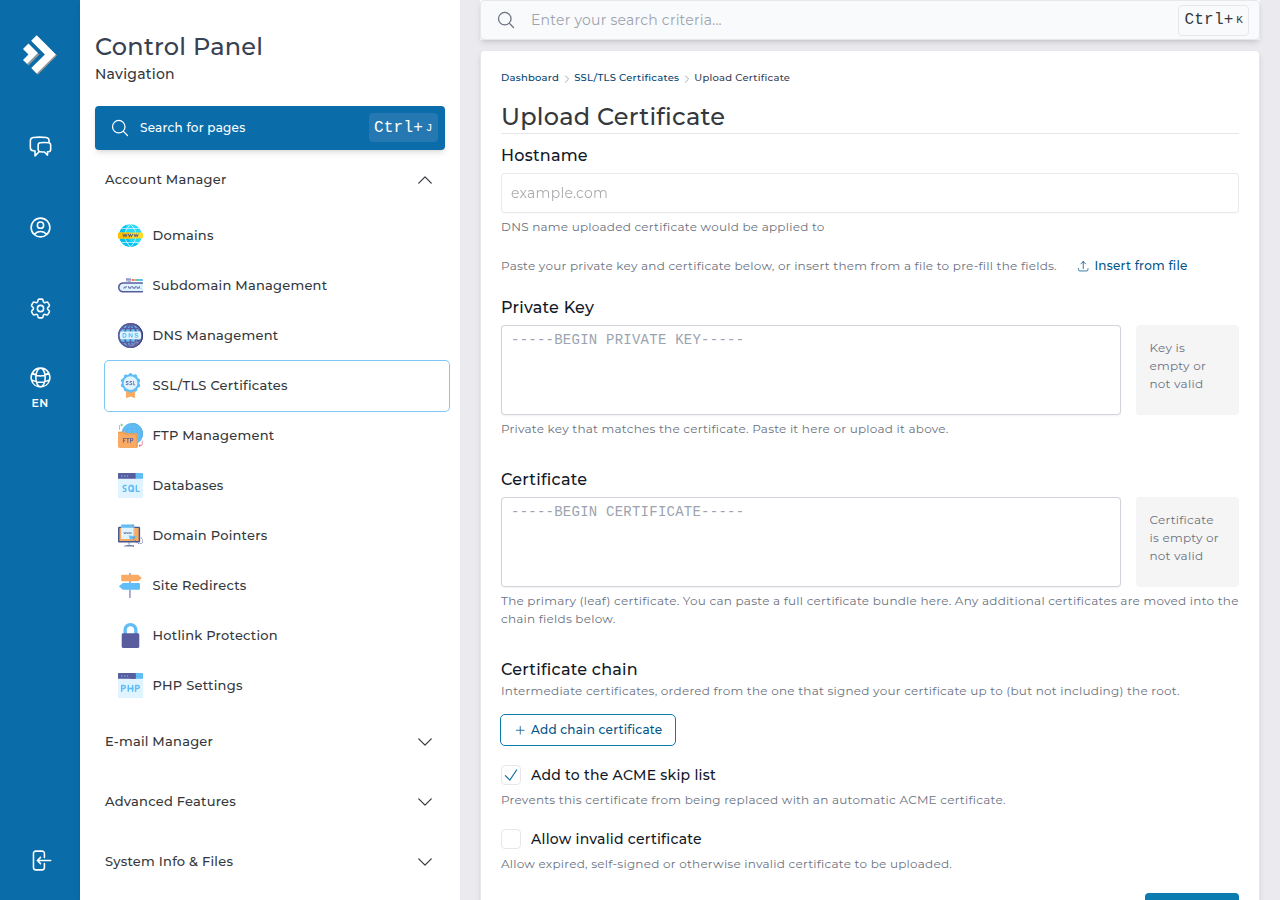
- Choose Upload custom certificate.Find the hostname's row, open its "⋯" menu and choose Upload custom certificate. The menu's other item, Create self-signed certificate, is not what you want for a public website. The Upload Certificate page opens.
- Check the Hostname,then fill in Private Key: paste the key block (
-----BEGIN PRIVATE KEY-----to-----END PRIVATE KEY-----), or use Insert from file. - Paste the Certificate.This is the primary (leaf) certificate for your domain. You can paste a full certificate bundle here; DirectAdmin moves any additional certificates into the chain fields below.
- Add the Certificate chain.If you pasted only your own certificate, press Add chain certificate and paste the intermediate certificates from your provider, ordered from the one that signed your certificate up to, but not including, the root. Without them, some browsers and apps show a "certificate not trusted" warning.
- Leave the two checkboxes as they are.Add to the ACME skip list is ticked by default and stops DirectAdmin replacing your certificate with an automatic one. Allow invalid certificate stays unticked.
- Save,then check the installation as shown in section 5.
If the upload is rejected and you can't see why, open a ticket with the domain and the exact error. Never include the private key in the ticket.
5. Check the installation
Confirm the key and certificate belong together (run on your own computer):
openssl x509 -noout -pubkey -in example.com.crt | openssl sha256
openssl pkey -pubout -in example.com.key | openssl sha256
After installing, confirm the server sends the full chain:
openssl s_client -connect example.com:443 -servername example.com </dev/null 2>/dev/null \
  | openssl x509 -noout -subject -issuer -dates
The subject should be your domain and the dates should match your new certificate. An online SSL checker also reports a missing intermediate certificate. Then open the site at https:// in a private browser window and check the padlock. In DirectAdmin, the Certificate list on the Manage certificates tab shows the certificate with its DNS names and expiry date.
6. Send every visitor to HTTPS
A certificate doesn't move visitors to https:// on its own. Turn on DirectAdmin's HTTPS redirect option for the domain if your panel shows it, or add this to the .htaccess file in public_html:
RewriteEngine On
RewriteCond %{HTTPS} off
RewriteRule ^ https://%{HTTP_HOST}%{REQUEST_URI} [L,R=301]
Use one method, not both, or you may get a redirect loop. For WordPress, also set both addresses under Settings › General to https://.
7. Common problems
| Symptom | Likely cause | Fix |
|---|---|---|
| The certificate and key do not match | The certificate was issued for a different CSR | Use the key that made the CSR, or create a new CSR and have the certificate reissued |
| "Not trusted" on some devices | The intermediate certificates are missing | Upload again and add the provider's intermediate certificates under Certificate chain |
| Wrong name on the certificate | www or the bare domain isn't on the certificate | Reissue with both names in the CSR |
| Old certificate still shown | The new one was uploaded for a different hostname, or the browser cached the old one | Check the certificate list in DirectAdmin; test in a private window |
| Redirect loop after forcing HTTPS | Two redirect methods, or a CDN talking to the server over HTTP | Keep one method; check your CDN's SSL mode |
An uploaded certificate is on the ACME skip list, so DirectAdmin will not replace it with a free Let's Encrypt certificate. If you stop using a paid certificate and want the automatic one back, look at the Skip list on the ACME settings tab, or ask support to switch the domain back for you.
8. Where Domain India hosting fits
Every Domain India shared hosting plan includes free SSL: AutoSSL with Let's Encrypt on cPanel, and Let's Encrypt in DirectAdmin. DirectAdmin plans also include weekly JetBackup backups. Compare plans on DirectAdmin hosting. On cPanel, see AutoSSL in cPanel instead.
- 10 GB NVMe SSD Storage
- 50 GB Monthly Bandwidth
- 1 Website
- 5 Email Accounts
Prices on the cards exclude 18% GST.
Do I need to buy an SSL certificate for my DirectAdmin website?
Usually not. Domain India DirectAdmin hosting includes free Let's Encrypt certificates, which are trusted by all modern browsers and are issued and renewed automatically. Buy a certificate only if a policy requires an OV or EV certificate or a specific certificate authority.
How do I install a certificate I bought elsewhere in DirectAdmin?
Create a private key and CSR with OpenSSL or your provider's tool, and send the CSR to your provider. Then open Account Manager › SSL/TLS Certificates, open the menu on the hostname's row and choose Upload custom certificate. Paste the private key, your certificate and the provider's intermediate certificates, and save.
Can I create a CSR in DirectAdmin?
No. DirectAdmin's SSL/TLS Certificates page has no CSR generator. Create the private key and CSR with OpenSSL on your own computer, or with your certificate provider's tool.
Why does my certificate not match my private key?
The certificate was issued for a CSR made with a different private key. Use the key that created that CSR, or create a new key and CSR and ask your provider to reissue the certificate.
Why do some visitors see a "not trusted" warning after installation?
The intermediate certificates are usually missing. Upload the certificate again and add the intermediate certificates from your provider under Certificate chain, then test the site again.
How long does a paid SSL certificate last now?
From March 2026 publicly trusted certificates can last at most 200 days, falling to 100 days in 2027 and 47 days in 2029. A manually installed certificate must be replaced by hand before it expires.
Does Domain India sell SSL certificates?
No. Domain India sells no SSL certificates. All shared hosting includes free SSL, and you can install a certificate you bought from another provider.
Ready to secure your site? Try the free route first with Let's Encrypt in DirectAdmin, open DirectAdmin from your hosting services, or open a support ticket if an installation fails.
Send us the domain and the exact error DirectAdmin shows, and we will check the certificate and chain with you. Never include your private key.
Open a support ticket